

Record a tab, a window or your screen in Chrome
Record This tab, a Window or a Screen with the Clevera Chrome extension: the popup's choices, microphone and camera access, tab and computer audio, the countdown, and what happens after you stop.
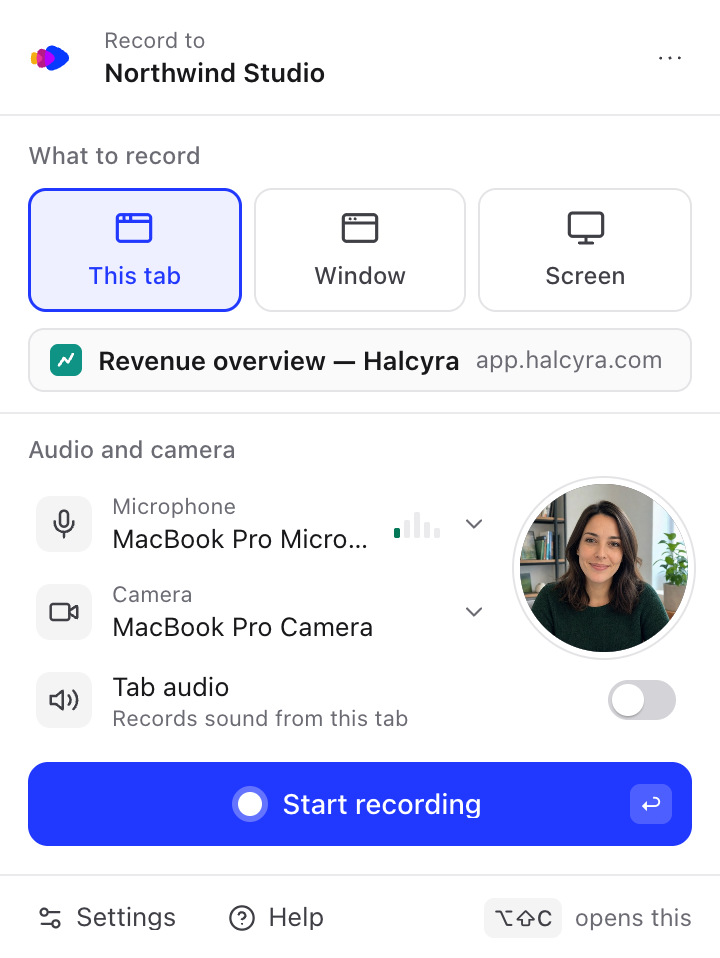
Click the Clevera icon in Chrome's toolbar, choose what to record, and click Start recording. When you stop, the recording uploads to your Clevera workspace and opens there, ready to turn into a video, a guide or an article. This article covers every choice in the popup, the countdown and what happens after you stop.
If you haven't added the extension yet, see Install the Clevera Chrome extension.
Make a recording
Open the popup
Click the Clevera icon in Chrome's toolbar, or press ⌥⇧C on a Mac (Alt+Shift+C on Windows, Linux and ChromeOS). To record a tab, open the popup on that tab.
Choose what to record
Under What to record, choose This tab, Window or Screen. See Choose what to record.
Choose your microphone, camera and sound
Under Audio and camera, pick a microphone and a camera, or leave them off. See Microphone and camera and Sound.
Start recording
Click Start recording, or press Enter. With Window or Screen, Chrome first asks what to share. Then a short countdown runs, the popup closes, and the Clevera icon shows REC.
Stop
Click the Clevera icon and click Stop, or press ⌥⇧X (Alt+Shift+X). The recording uploads by itself. See Stop, pause, restart or delete a Chrome recording.
Choose what to record
| Choice | What it records | How you pick it |
|---|---|---|
| This tab | The tab you opened the popup on, and only that tab. Other tabs, windows and notifications are never in the video. | Nothing to pick. The popup shows the tab's title and site. |
| Window | One window of any app. | After you click Start recording, Chrome asks which window to share. |
| Screen | A whole display, including everything on it. | After you click Start recording, Chrome asks which screen to share. |
You can also switch with ⌘1, ⌘2 and ⌘3 on a Mac (Ctrl+1, Ctrl+2, Ctrl+3 elsewhere) while the popup is open. Clevera remembers your last choice.
With This tab, the recording follows that tab: you can go to other pages or sites in it and keep recording. Closing the tab stops the recording and uploads it.
On a Mac, recording a Window or a Screen needs the Screen Recording permission for Chrome. See Fix problems with the Chrome extension.
Where the recording goes
The top of the popup shows Record to and your workspace. Every recording uploads there. To record to another workspace, see Install the Clevera Chrome extension.
The recording is named after the tab's title (its address when it has no title). With Window or Screen, it's named "Window" or "Screen": no page title leaves your browser. You can rename it in Clevera.
Microphone and camera
Both are optional. Chrome asks your permission once for each.
Allow access
Next to Microphone or Camera, click Allow. A small Clevera window opens with Allow microphone (or Allow camera). Click it, then choose Allow in Chrome's prompt. The window says "Microphone allowed. You can close this window."
Pick a device
Back in the popup, click the microphone or camera name to choose another device, or No microphone or No camera to record without it. A level meter moves next to the microphone while you speak.
The camera shows as a round Camera preview in the popup only, so you can check how you look before you start. Nothing floats over your screen while you record. The camera is recorded as its own video, and Clevera places it in the editor, where you choose where and whether it appears.
If your last microphone or camera isn't connected, the popup says, for example, "Your last microphone isn't connected. Using MacBook Pro Microphone." and records with that one.
If Chrome blocked the microphone or camera
If you once chose Block (or Never allow), the popup says Microphone is blocked in Chrome or Camera is blocked in Chrome with a Fix button.
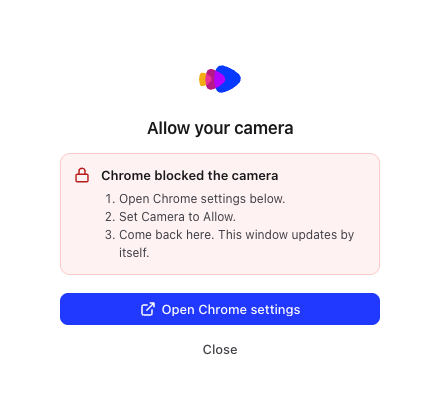
- Click Fix, then Open Chrome settings. Chrome opens Clevera's site settings.
- Set Microphone or Camera to Allow.
- Come back to the Clevera window. It updates by itself, without reopening.
On a Mac, the system can also block Chrome from using the microphone or camera. See Fix problems with the Chrome extension.
Sound
| You record | Sound option | What it records |
|---|---|---|
| This tab | Tab audio ("Records sound from this tab") | Sound the tab plays, such as a video or a notification sound. |
| Screen on Windows or ChromeOS | Computer audio ("Records sound from your computer") | Sound from your computer. |
| Window, or Screen on a Mac or Linux | None | Clevera doesn't record sound here. Use your microphone for narration. |
Tab audio and Computer audio are off until you turn them on. Your choice is remembered, and you can also set it in Settings → Recording.
What Clevera gets from the recording
The extension records the picture and sound, and your microphone and camera if you chose them. It doesn't capture clicks, scrolling or typing, so Clevera treats the recording like an uploaded video: the AI works from what it sees and hears. For zooms and steps that follow your clicks, record with the desktop app. See Choose between the desktop app and the Chrome extension.
The countdown
After you click Start recording, the popup shows Recording starts in and counts down, so you have time to get ready. It also says how to stop, for example "To stop, click the Clevera icon in the toolbar or press ⌥⇧X."
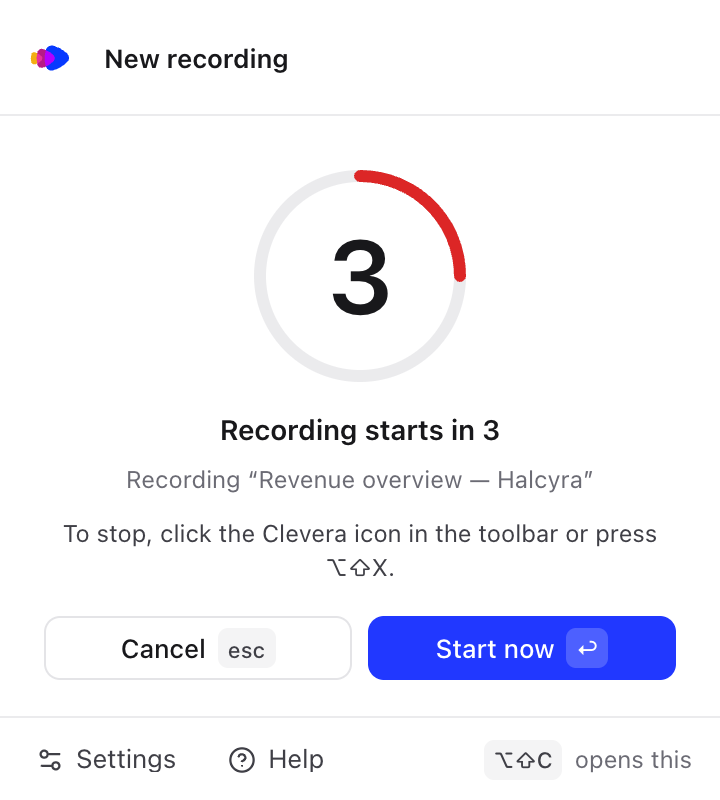
- Start now (or Enter) starts recording right away.
- Cancel (or Esc) stops the countdown. Nothing is recorded.
- The countdown is 3 seconds unless you change it. Choose Off, 3, 5 or 10 seconds in Settings → Recording → Countdown.
With Window or Screen, Chrome's share dialog comes first. After you pick what to share, the popup comes back with the countdown (in Chrome 127 or later) and closes itself just before recording starts, so it isn't in your video. With Off, recording starts as soon as you pick.
When the countdown ends, the popup closes. The Clevera icon shows REC while you record.
After you stop
- The popup says Saving your recording… ("It starts uploading in a moment. You can close this.").
- The recording uploads. Long recordings upload in parts while you record, so the upload often finishes soon after you stop. The Clevera icon shows the progress, for example 42%, and the popup shows Uploading and the recording's name.
- When the upload is done, the recording opens in a new tab in Clevera's Create page, where you choose what to make from it. The popup shows Uploaded with Open for a short while.
After your first upload, the popup shows a tip, "Your recording is in your Clevera workspace.", with Open Clevera. You'll find every recording in your workspace. See Find and reuse your recordings.

You can start a new recording while earlier ones are still uploading.
Recordings stop by themselves at 60 minutes, and upload as usual. See Stop, pause, restart or delete a Chrome recording.