

Adjust zooms and camera moves
Turn automatic zooms off, change their level, add your own, or draw a zoom-and-pan path in the video editor's Zoom tab. How zooms follow your cursor, every setting and its default.
Clevera adds zooms to videos made from your recording so viewers can see what you click. The Zoom tab in the video editor lets you turn each zoom off, change how close it goes, add your own, or draw an exact zoom-and-pan path.
Before you start
- The Zoom tab is in the video editor for how-to videos, product demos and Polish videos. Social clips don't have it: their camera moves are planned with each scene. To change one, ask the assistant, for example "zoom in closer on the click in scene 3", or edit the recording's Segments in its options. See Edit a social clip.
- You need edit rights on the video.
- Zooms on a recording made with the Clevera desktop app follow your cursor. Uploaded video files have no cursor data, so their zooms go to a fixed focus point instead.
How automatic zooms are made
While generating a how-to video or product demo, the AI watches the recording and decides when a closer look helps: a click, a form being filled, a menu opening. It adds a zoom for each of those moments. Because the cursor isn't burned into your recording, the camera can follow it smoothly while zoomed in. See Understand automatic zooms and cursor effects.
The zoom list
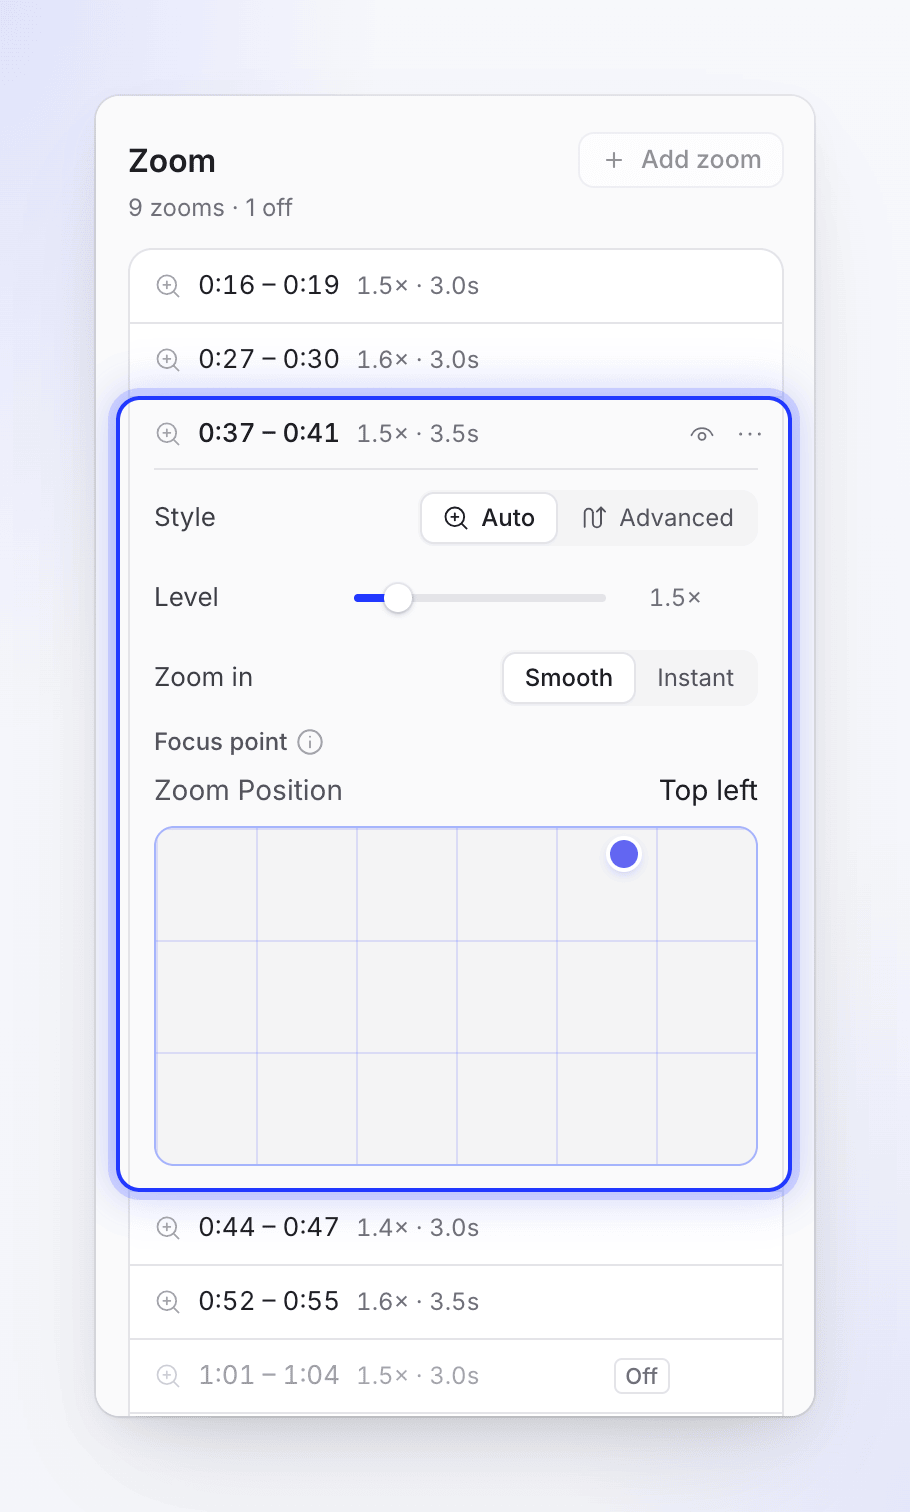
Open the Zoom tab. The header counts the zooms, for example "22 zooms · 3 off". Each row shows when the zoom plays ("0:05 – 0:10") and its level and length ("1.5× · 5.0s"), or Path for a custom path.
| Control | What it does |
|---|---|
| Eye button | Turn this zoom off / Turn this zoom on. An off zoom keeps its settings and shows Off. |
| Click a row | Opens its settings and moves the playhead to its start |
| ⋯ (Zoom n options) | Edit path… (Advanced zooms) and Delete zoom |
Deleting asks "Delete zoom 3?": "It is removed from the timeline. Undo brings it back."
The list follows the playhead as the video plays.
Change a zoom
Open a zoom's row and choose its Style:
- Auto: "Follows the cursor (or the focus point)". Set how close it goes and how it starts.
- Advanced: "Your own zoom and pan path". Draw exactly where the camera looks over time.
Auto settings
| Setting | Options | Default |
|---|---|---|
| Level | 1.1×–4.0× | 1.5× |
| Zoom in | Smooth ("Eases in") or Instant ("Cuts straight to the zoom") | Smooth |
| Focus point (videos without cursor data) | Drag a point on the 3×3 grid: Top left, Top center, Top right, Center left, Center, Center right, Bottom left, Bottom center, Bottom right, or anywhere in between (Custom). "Where the camera zooms to. This video has no cursor to follow." | Set by the AI |
Move or resize a zoom
Zooms have their own track on the timeline. Drag a zoom block to move it, or drag its edges to make it longer or shorter (at least 1 second). Zooms can't overlap. Double-click a zoom block to open it in the Zoom tab. Select it and press Delete to remove it, or ← / → to nudge it by a frame (Shift: a second).
Add a zoom
Move the playhead
Put the playhead where the viewer should look closer.
Click Add zoom
A 5-second zoom at 1.5× starts at the playhead. If the video has no zooms yet, the tab says "No zooms yet" with the same Add zoom button.
Adjust it
Change its level or style in the tab, and drag its edges on the timeline.
Add zoom is disabled when "The playhead is inside another zoom" or the playhead is "Too close to the end of the video" (less than half a second left).
Draw a zoom and pan path
Use Advanced when you want the camera to move between several spots, for example from a menu to the panel it opens. The full guide, with a worked example, is Draw a zoom and pan path.
Switch the zoom to Advanced
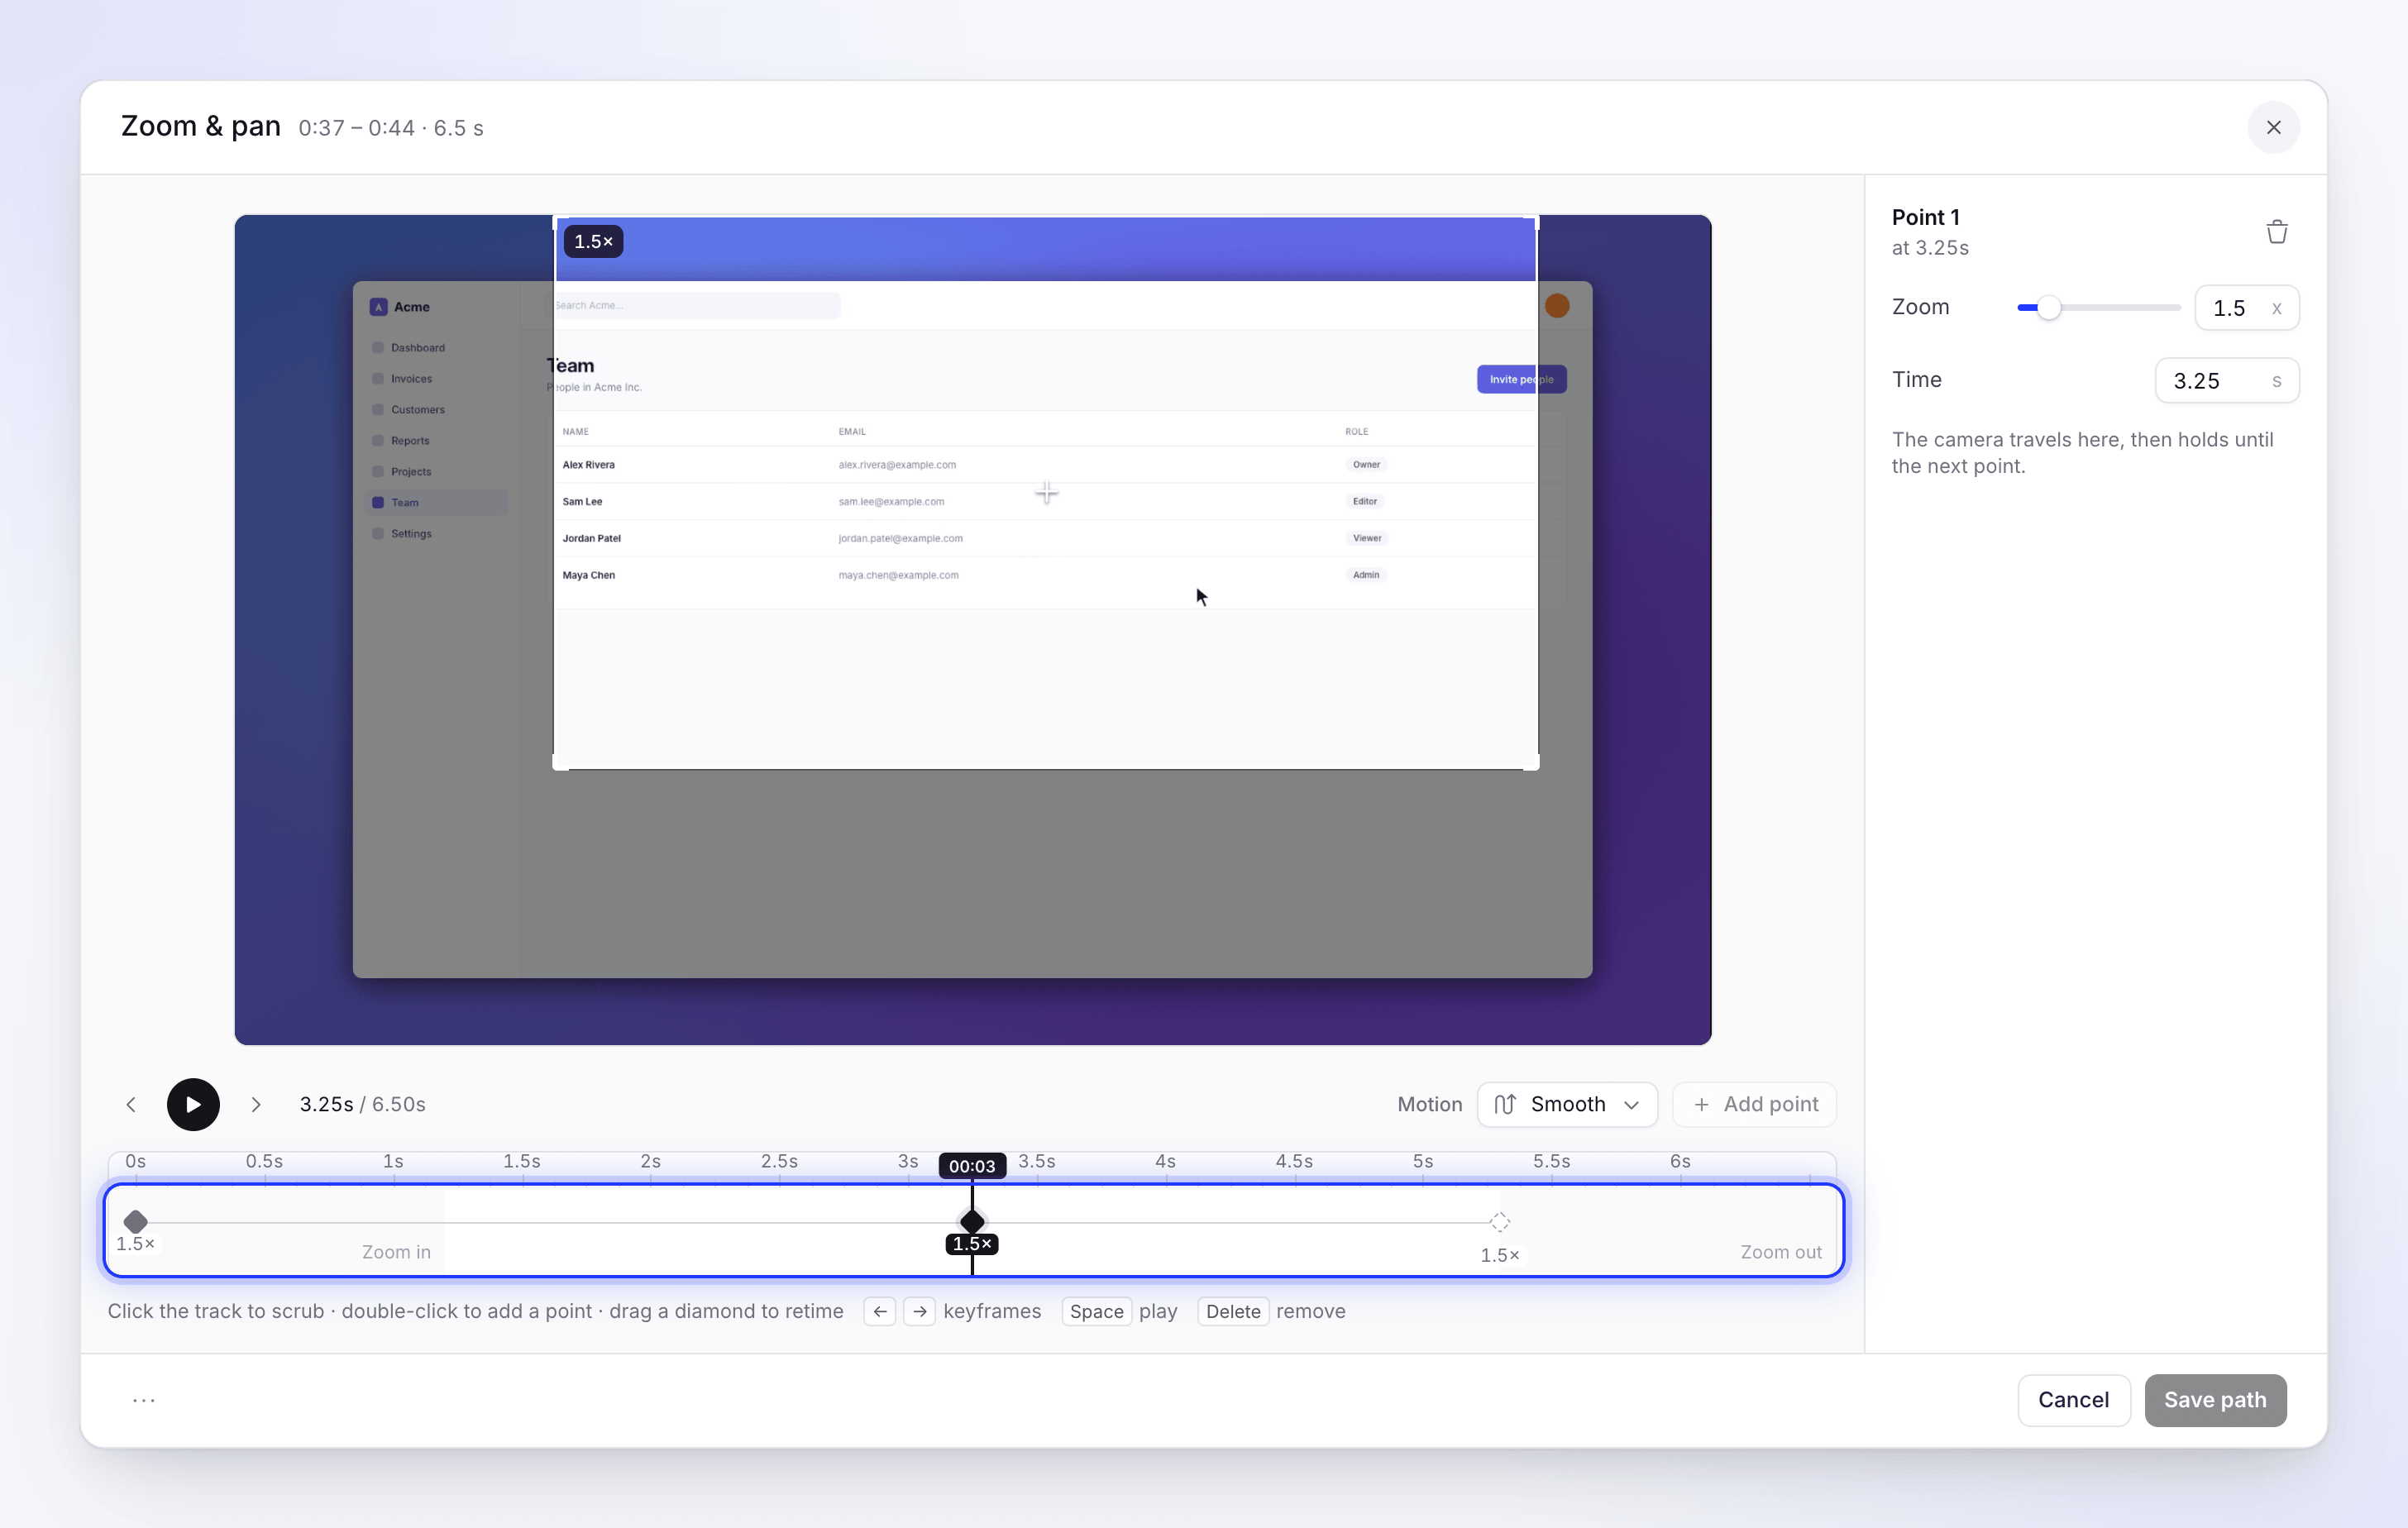
Open the zoom, set Style to Advanced and click Edit path…. The Zoom & pan window opens with the zoom's time range. The first time, the path starts from the camera motion the Auto zoom already played.
Set where the camera lands
Select the first diamond (Zoom in) and drag the frame on the video to where the camera should look. Set its Zoom (1.1×–4×).
Add points
Move the playhead and click Add point (or double-click the track). The camera travels to each point and holds there. Select a point to set its framing, Zoom and Time.
Choose the motion
Use Motion: Smooth ("Even ease · 1.2 s", default), Magnetic ("Soft landing · 1.3 s") or Snap ("Cuts, no travel").
Play and save
Click Play the path to check it, then Save path.
How the path works:
- Zoom in: the first diamond, where the camera lands. It's always at the start and can't be deleted.
- Points: the camera travels to each one and holds until the next.
- Zoom out: starts after the last point, on its own. Its position follows the point before it.
| Path limit | Value |
|---|---|
| Points per zoom | Up to 20 |
| Space between points | At least half a second |
| Where points can go | Not during the zoom-in or zoom-out animation |
Keyboard in the Zoom & pan window: ← and → move between points, Space plays, Delete removes the selected point. Path options → Reset path starts over. Cancel on a zoom that never had a saved path turns it back to Auto.
Zooms, steps and languages
- Zooms are tied to a moment of the recording. When a step before a zoom gets longer or shorter, for example after you edit its narration or its sync and pacing, the zoom moves with it.
- The camera of a how-to step comes only from the Zoom tab. Edit sync and pacing chooses footage and speed; it has no camera controls in these videos.
- Each language of a video has its own zooms. A zoom you add after translating appears only in the language you have open. See Understand language versions.
- The top-bar Undo covers zoom changes.
What it costs
Changing, adding and deleting zooms is free. It doesn't use credits.
There's no button to remove all zooms or to make the AI redo them. Turn zooms off one by one, or restore an earlier version from the revision history. Restoring Only some parts doesn't include zooms; restore the Whole video to get earlier zooms back.