

Set up SSO with Okta
Step-by-step Okta setup for Clevera single sign-on, with SAML 2.0 or OpenID Connect: the Okta app settings, which Okta values go into which Clevera field, assigning people, and testing.
Set up single sign-on between Okta and Clevera so your team signs in with their Okta account. You can connect with SAML 2.0 or OpenID Connect (OIDC); this guide walks through both on the Okta side and the matching fields in Clevera.
Okta's admin console changes from time to time. If a label below doesn't match what you see, look for the setting with the same meaning, and use the general guides for the full list of values: SAML, OIDC.
Before you start
- You're the owner of a Clevera workspace on a Custom plan.
- You're an Okta admin who can create app integrations and assign them.
- You know the email domains your people use in Okta, such as
acme.example.
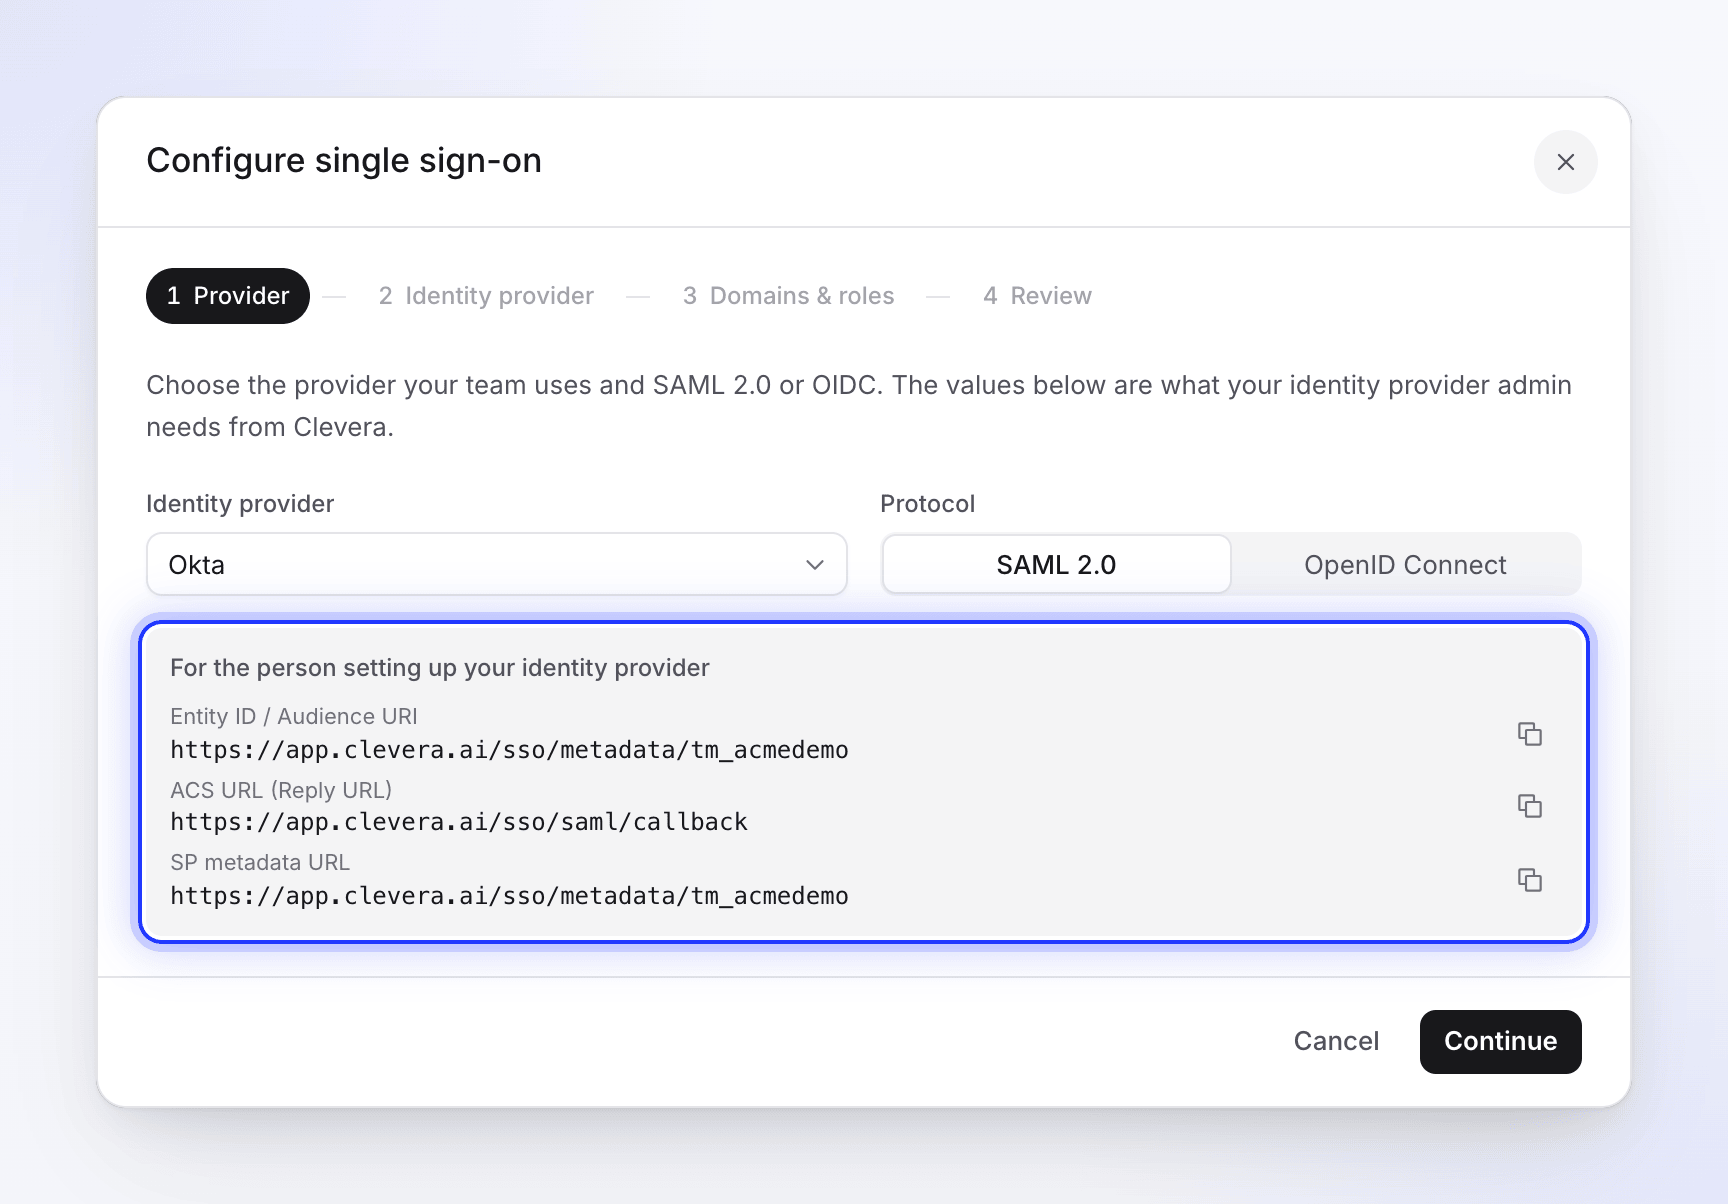
Open the Clevera setup dialog first, so you can copy values from it: open the workspace menu at the top of the sidebar, choose Team settings, then Security, and click Set up SSO. Choose Okta as the Identity provider.
Connect with SAML 2.0
Create the app in Okta
In the Okta Admin Console, go to Applications → Applications and click Create App Integration. Choose SAML 2.0 and click Next. Name it
Cleveraand click Next.Enter Clevera's values
Under SAML Settings, fill in:
Okta field Value from Clevera Single sign-on URL ACS URL (Reply URL): https://app.clevera.ai/sso/saml/callback. Keep Use this for Recipient URL and Destination URL ticked.Audience URI (SP Entity ID) Entity ID / Audience URI (copy it from the Clevera dialog; it ends in your workspace ID) Default RelayState Leave empty Name ID format EmailAddressApplication username EmailCheck signing
Click Show Advanced Settings and check that Response and Assertion Signature are both Signed, Signature Algorithm is RSA-SHA256, and Assertion Encryption is Unencrypted. Clevera needs both the response and the assertion signed.
Add name attributes
Under Attribute Statements, add
firstNamewith valueuser.firstNameandlastNamewith valueuser.lastName. Clevera uses them to name new accounts. Click Next, answer Okta's feedback question as an internal app, and click Finish.Copy Okta's values into Clevera
On the app's Sign On tab, open the SAML setup details (View SAML setup instructions, or More details in newer consoles). In Clevera, set Protocol to SAML 2.0, click Continue, and paste:
Okta value Clevera field Identity Provider Issuer (or Issuer) IdP Entity ID Identity Provider Single Sign-On URL (or Sign on URL) SSO sign-in URL X.509 Certificate (or Signing Certificate) X.509 certificate Leave Logout URL empty unless you use Okta single logout.
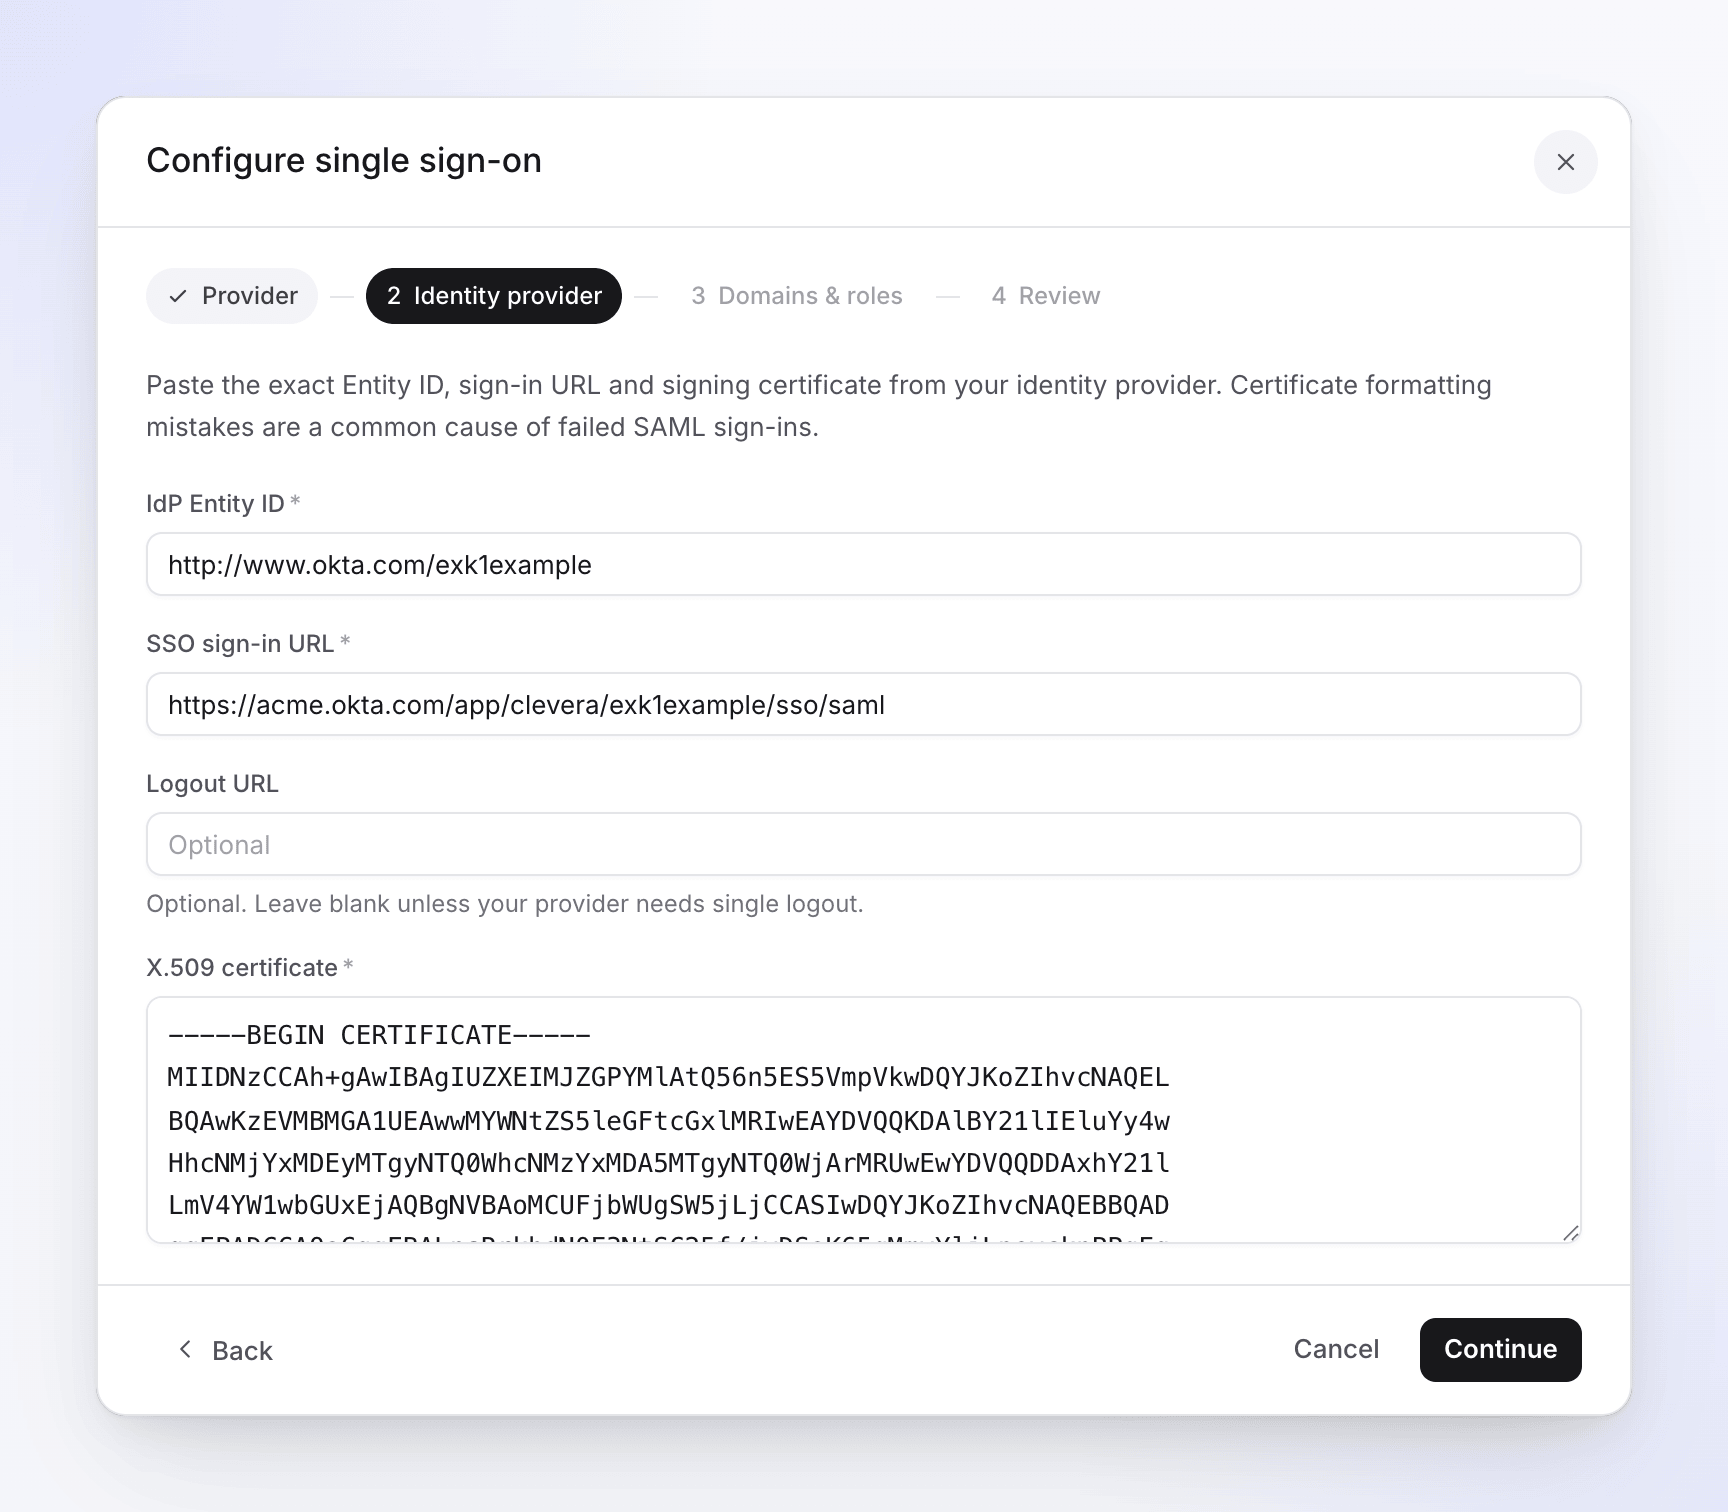
Logout URL is optional. Assign people
On the app's Assignments tab, click Assign and add the people or groups who should use Clevera. People who aren't assigned can't sign in through Okta.
Then finish in Clevera: domains and roles.
Connect with OpenID Connect
Create the app in Okta
Go to Applications → Applications → Create App Integration. Choose OIDC - OpenID Connect, then Web Application, and click Next.
Set the redirect URI
In Clevera's setup dialog, set Protocol to OpenID Connect and copy the Redirect URI (callback URL) from the grey box. Then fill in Okta:
Okta field Value App integration name CleveraGrant type Authorization Code Sign-in redirect URIs The Redirect URI (callback URL): https://app.clevera.ai/sso/oidc/callbackSign-out redirect URIs Remove the example; leave empty Controlled access Choose who can use the app, or Skip group assignment for now and assign later Click Save.
Copy the credentials
On the app's General tab, under Client Credentials, copy the Client ID and the Client secret. Leave Client authentication set to Client secret.
Fill in Clevera
In Clevera, click Continue and enter:
Clevera field Value Client ID Okta's Client ID Client secret Okta's Client secret Discovery URL https://your Okta domain/.well-known/openid-configuration, for examplehttps://acme.okta.com/.well-known/openid-configurationIf you use a custom authorization server, use its own discovery URL instead, for example
https://acme.okta.com/oauth2/default/.well-known/openid-configuration.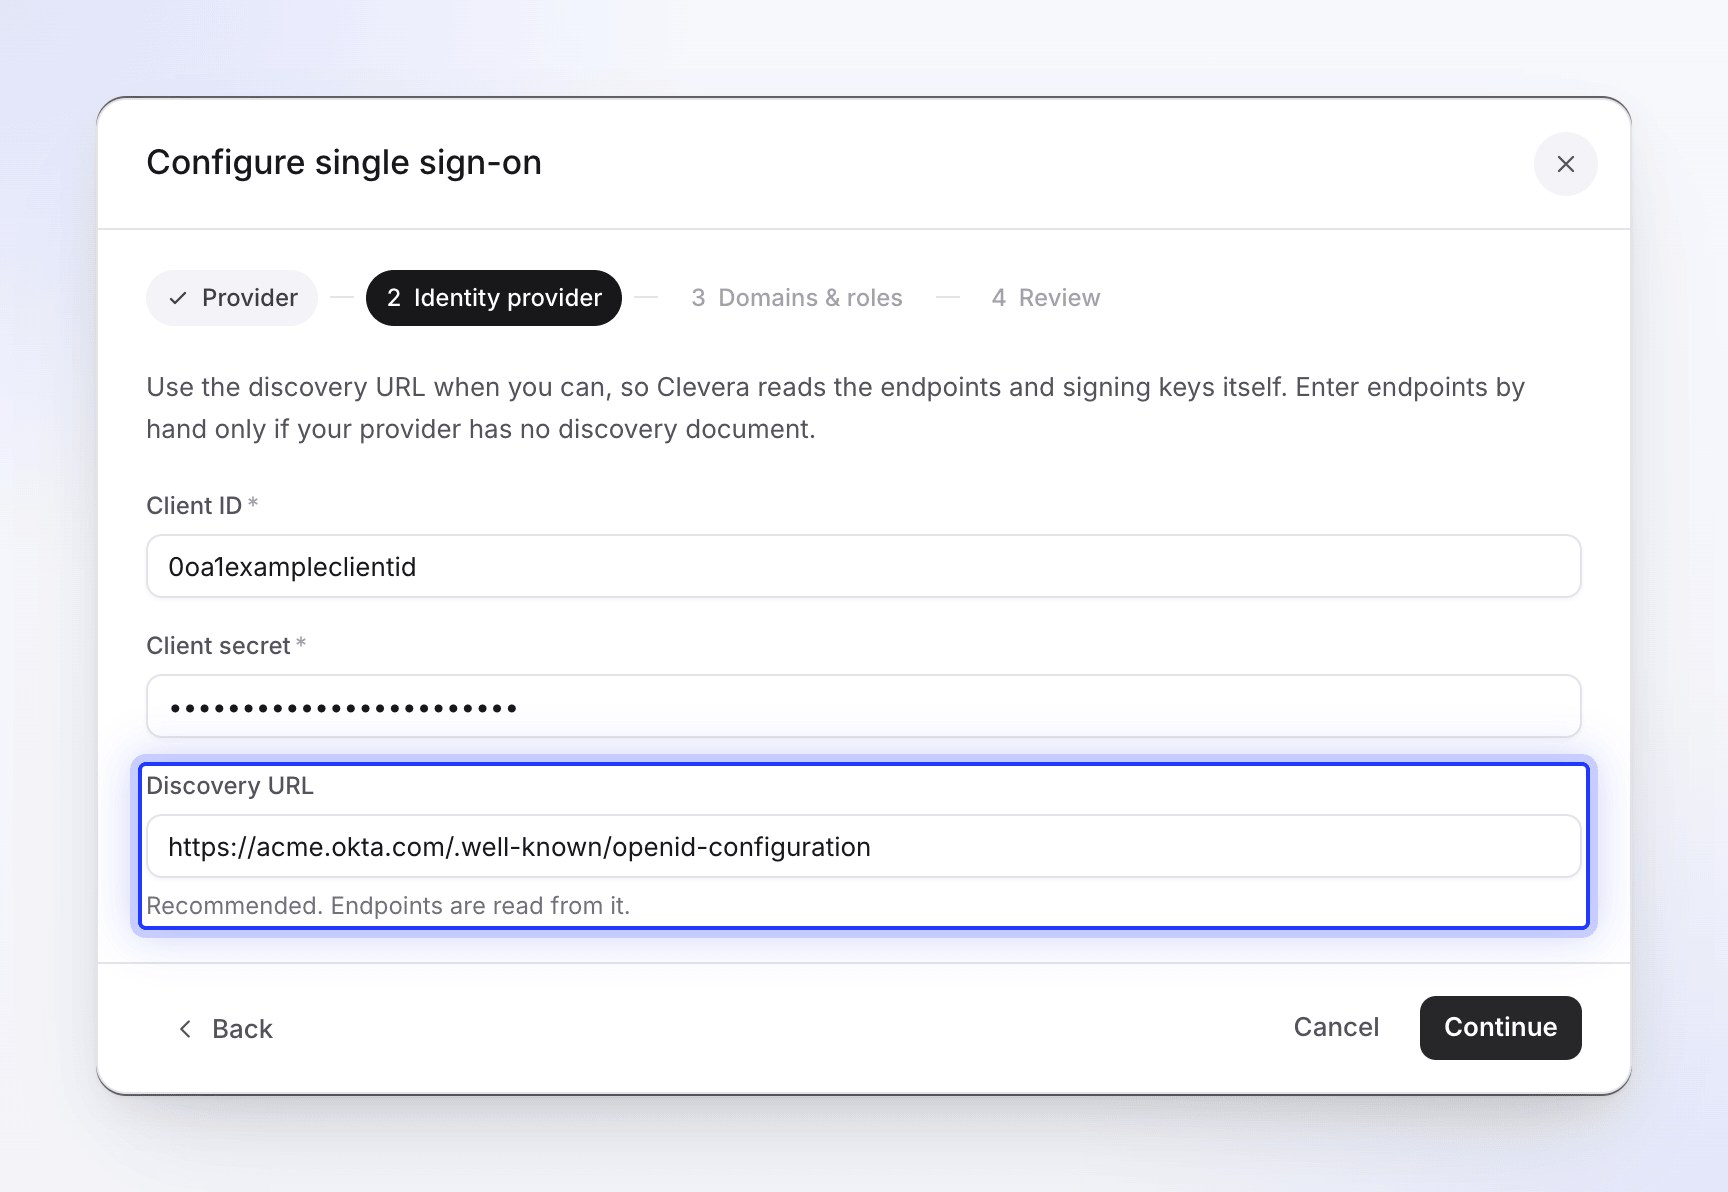
With a discovery URL, the endpoint fields stay hidden. Assign people
On the Assignments tab, assign the people or groups who should use Clevera.
Finish in Clevera
- On Domains & roles, add every email domain your Okta users have, choose Create accounts on first sign-in and the Default role for new SSO members.
- On Review, click Save configuration.
- Click Run test, switch on Enable SSO, and sign in as an assigned test user in a private window, starting from the Clevera sign-in page.
- When it works for everyone, switch on Require SSO if you want SSO to be the only way in.
Members then type their work email on the Clevera sign-in page and click Continue with Okta.
Troubleshooting
| Problem | What to check |
|---|---|
| "SSO authentication failed…" right after the Okta sign-in, with SAML | Response and Assertion Signature both Signed; the certificate in Clevera is the app's current signing certificate; the Audience URI matches Clevera's Entity ID exactly. |
| "SSO session expired. Please try again." after clicking the Clevera tile in Okta | Expected: sign-in has to start on the Clevera sign-in page. |
| Okta says the user isn't assigned to the app | Assign them on the app's Assignments tab. |
| "Your email domain is not authorized for this team's SSO." | The person's Okta email uses a domain that's not in Allowed email domains. Add it in Clevera. |
| Okta shows a redirect URI error (OIDC) | Sign-in redirect URIs must be exactly the Redirect URI (callback URL) from Clevera, https://app.clevera.ai/sso/oidc/callback. |
More messages: Fix SSO sign-in problems.