

Understand the timeline
What each lane of the video editor's timeline holds, which blocks you can move or trim and why steps can't be, hide vs mute vs delete, the music lane, splitting clips, aspect ratio and crop.
The timeline under the player shows every part of a video made from your recording in time order: the steps and scenes, the zooms, the elements on top and the music. This article explains each lane, what you can move or trim and why some blocks can't be, and how hiding, muting and deleting differ.
Before you start
- This covers how-to videos, product demos and Polish videos. The social clip timeline works differently; see Edit a social clip.
- Without edit rights you can play and scrub, but not change anything.
The lanes
Lanes have no names on screen; you tell them apart by what's on them. From top to bottom:
┌ Elements ──── [Text Box]   [Blur]       [Sound Effect]
│               [Image ───────────]
├ Scene row ─ [Intro card][Step 1 ▒▒▒▒][Step 2 ▒▒▒▒▒▒][Title card][Step 3 ▒▒▒]…
├ Zoom ─────────── [1.5×]        [2×]           [1.6×]
└ Music ─── ♪ Breathe Easy ─────────────────────────────────── Volume 40%
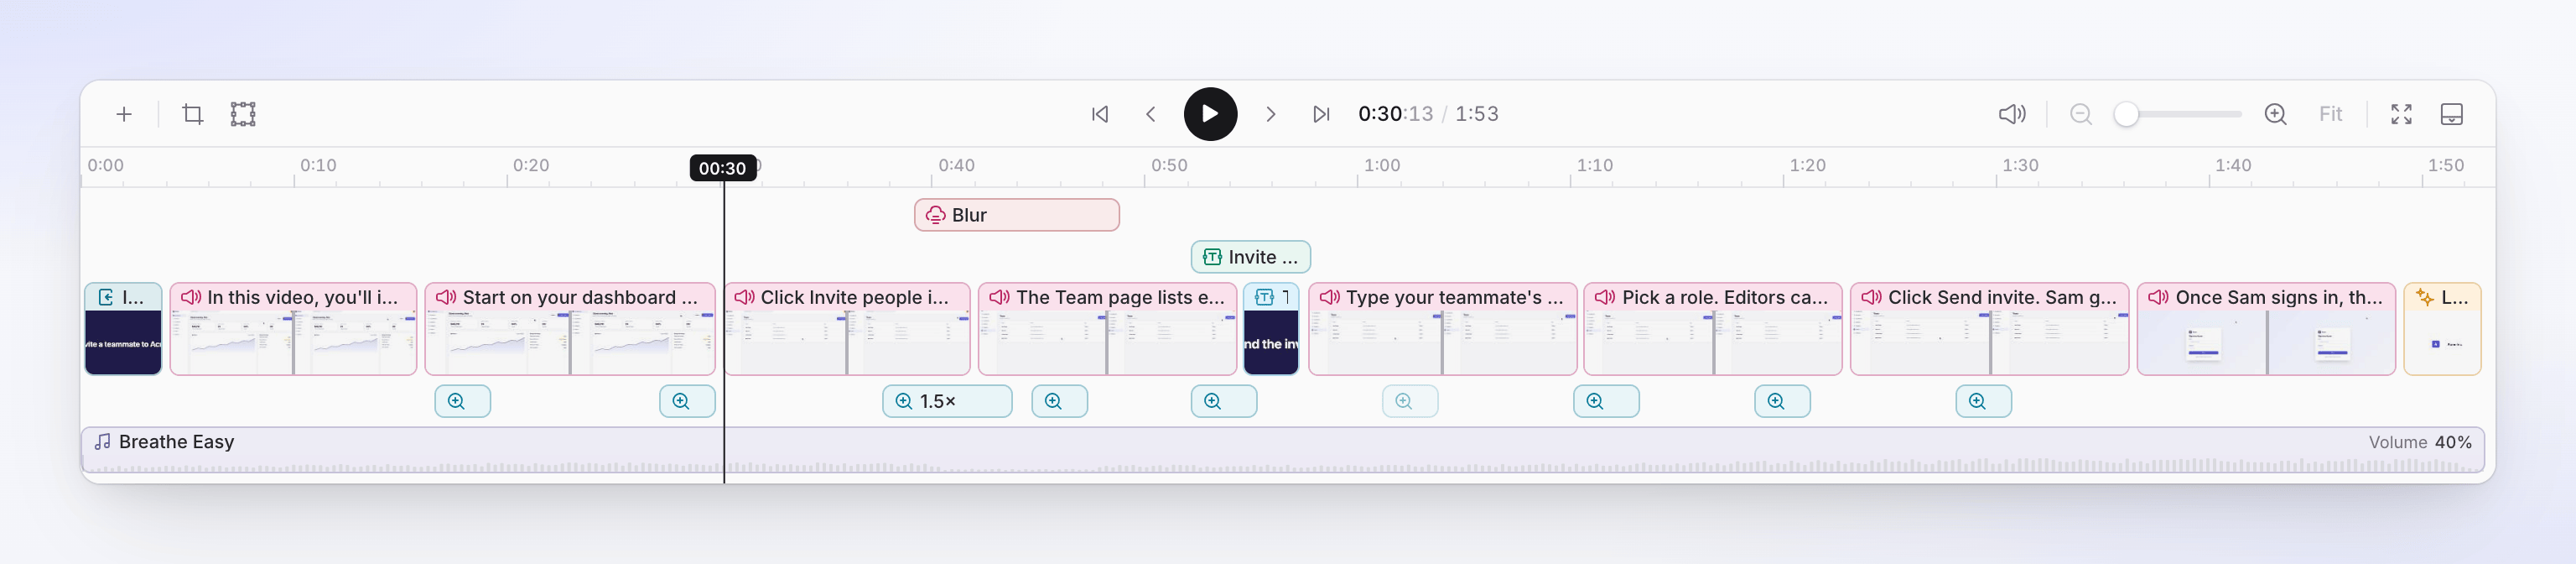
| Lane | What's on it | Edit it in |
|---|---|---|
| Elements | One or more rows of text, images, blur, highlights, shapes, emoji, audio and sound effects, above the scene row. Newer rows go on top. | Elements tab |
| Scene row | Every step and scene, back to back, with a strip of picture thumbnails. Steps show their narration text; scenes show their type: Introduction, Conclusion, Voiceover, Intro card, Title card, Logo reveal, Text beats, List, Video, Clip, Voice clip, Video Cover. | Script tab, or the scene's editor |
| Zoom | One block per zoom, under the scene row, labeled with its level ("1.5×") | Zoom tab |
| Music | The background music, with its file name and volume | Audio tab, and the lane itself |
An empty lane isn't shown: a video without zooms has no zoom lane. Captions and chapters don't have lanes. Captions follow the narration automatically; chapters are headings in the Script tab.
Selecting opens the right tab
Click a block to select it. The playhead moves to it and the side panel switches to the tab that edits it:
| You select | The side panel opens |
|---|---|
| A step or scene | Script, at that step |
| A zoom | Zoom, with that zoom open |
| An element | Elements, with its options |
| The music | Audio, at Music |
Double-click goes one step further. After you hover a block for a second, a hint tells you what it does:
| You double-click | What opens |
|---|---|
| A step, intro, conclusion, voiceover, clip or voice clip | The Sync & pacing window. See Use sync and pacing. |
| A card or other scene | Its editor. See Edit scenes and cards. |
| A zoom | Its settings in the Zoom tab ("Double-click to open zoom settings") |
Move, trim and nudge
| Block | Move | Trim (drag an edge) | Why |
|---|---|---|---|
| Step | No | No | Its length comes from its narration and its clips. Change it with Edit sync and pacing, or by editing the narration. |
| Card or other scene | No | No | Its length is the Duration in its editor. |
| Zoom | Yes | Yes | |
| Element | Yes, also to another row | Yes | |
| Music | Its start and end, on the lane | Yes | See Shape the music on its lane. |
Rules for moving and trimming:
- A block is at least 1 second long.
- Blocks on the same row can't overlap, and nothing goes past the end of the video.
- Blocks snap to the edges of blocks on other rows and to the playhead.
- Drag an element clearly up or down to move it to another row, or to a new row (a New track line shows where it lands).
- ← / → nudges the selected zoom or element by one frame; with Shift, by one second. Delete or Backspace removes it. Neither works on steps and scenes.
Zooms and elements are tied to their place in the recording. When a step before them gets longer or shorter, they move with it.
The playhead
- Click an empty part of the timeline to move the playhead there; drag to scrub.
- While paused, hovering the timeline previews that frame in the player. Move the pointer away and the player goes back to the playhead.
- Space plays and pauses. Go to start, Previous frame, Next frame and Go to end are in the toolbar.
Zoom the timeline
| To | Do this |
|---|---|
| See more detail | Zoom in (Ctrl + scroll), drag the Timeline zoom slider, or pinch on a trackpad. Up to 16×. |
| See less | Zoom out |
| See the whole video | Fit the whole video |
| Make the timeline taller or shorter | Drag the divider above it ("Drag to resize · double-click to fit") |
| Hide it | Collapse timeline. The collapsed bar has a Timeline button ("Show the timeline") to bring it back. |
Videos longer than a minute open zoomed in, about a minute at a time.
Hide, mute or delete
Three ways to take something out of a video, with different results:
| Action | Where | What happens to the time | Undo it with |
|---|---|---|---|
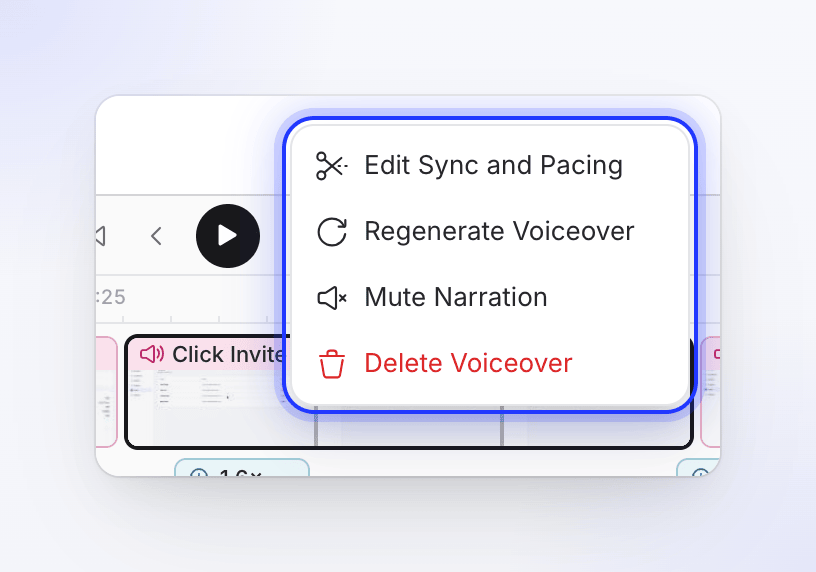
| Mute narration (steps) | Script tab row, or right-click → Mute Narration | The step stays, silent. Its length becomes the length of its clips, so the video usually gets shorter. Shows Muted. | Unmute narration, or edit and save the line |
| Hide from video (introduction, conclusion, cover) | Script tab ⋯, or right-click → Hide from Timeline | It's taken out of the video and its time is removed. It stays in the Script tab with Hidden. | Show in video in the Script tab |
| Hide in video (elements) | Elements tab eye button, or ⋯ in its options | The element stays in the Elements list, greyed out, and doesn't show in the video. Nothing else moves. | Show in video |
| Delete narration (steps) | Script tab ⋯, or right-click → Delete Voiceover | The line and its voice-over are removed. You choose what happens to its footage: Move video to previous voiceover, Move video to next voiceover or Remove video too. | Revision history |
| Delete (scenes, clips) | Right-click → Delete, or the scene's menu | Removed; the scenes after it move earlier. The timeline menu warns "This can't be undone." | Revision history |
Introduction and conclusion
Many videos start with an Introduction and end with a Conclusion: narrated steps that hold one frame of the recording (or, for some introductions, play a short preview of moments from across it). On the timeline they show their narration text. They can be hidden, but not muted. Pick the frame they hold with Edit sync and pacing.
Shape the music on its lane
Select the music lane to expand it ("Select to expand — adjust fades, music region & volume dips"). Then:
| To | Do this |
|---|---|
| Start or end the music elsewhere | Drag the start or end of the music region. Outside it the lane says "Silent — music starts at…". The region is at least 0.5 seconds. |
| Change a fade | Drag the fade handle at either end. Defaults: 1 second in, 2 seconds out. |
| Lower the music under a moment | Drag across the lane ("Drag to add a volume dip"). How far down you drag sets how quiet it gets, down to silent. A dip is at least 0.3 seconds, with 0.4-second ramps at its edges. |
| Change a dip | Drag it to move it, drag its edges to resize it, drag its level handle to change how quiet it is |
| Remove a dip | Double-click it |
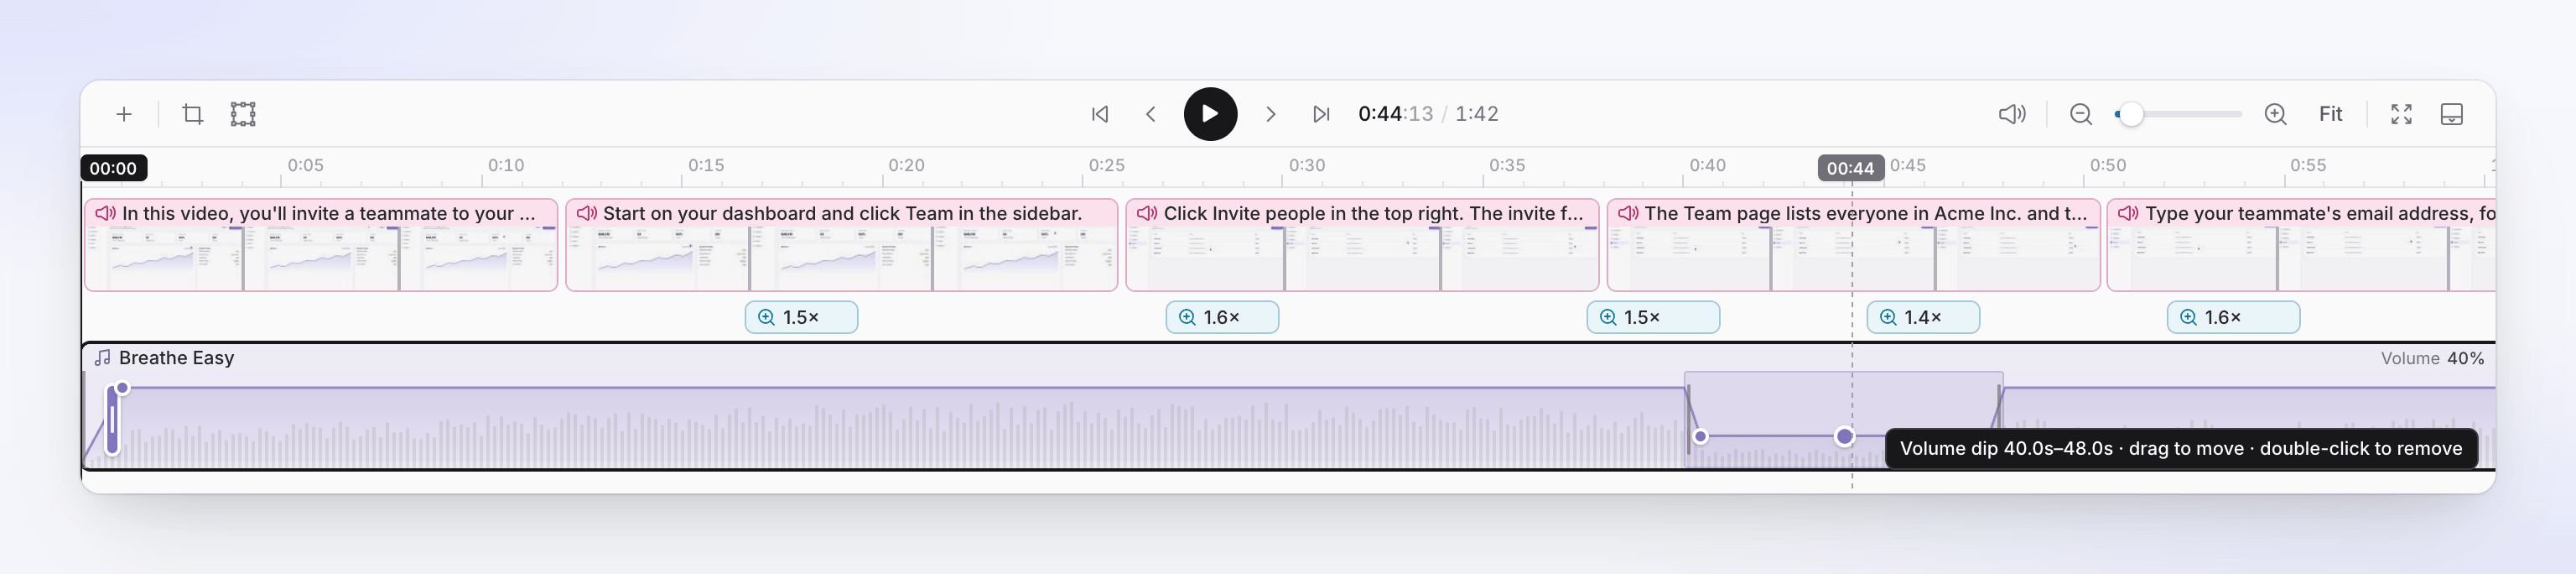
The music doesn't lower itself under the voice-over automatically in these videos. Add dips where it competes with the narration. To undo all lane edits: Audio → Music → ⋯ → Reset timeline edits…. See Change voice, music and sound.
Split a clip (Polish videos)
Polish videos have Split clip at playhead in the toolbar. Put the playhead inside a Clip or Voice clip and click it to cut the clip in two at that point, for example to delete a mistake in the middle. It's off ("Move the playhead inside a clip to split") when the playhead isn't inside a clip, or is within 0.1 seconds of its edge. How-to videos and product demos don't have it: change what a step shows with sync and pacing instead.
Add things between scenes
Hover the seam between two scenes:
- + (Add timeline item) opens the same menu as the toolbar's +, at that spot.
- Add transition adds a transition between the two scenes (Edit transition once there is one). See Add and edit elements.
Aspect ratio and crop
Both are in the timeline toolbar, and both apply to every language of the video.
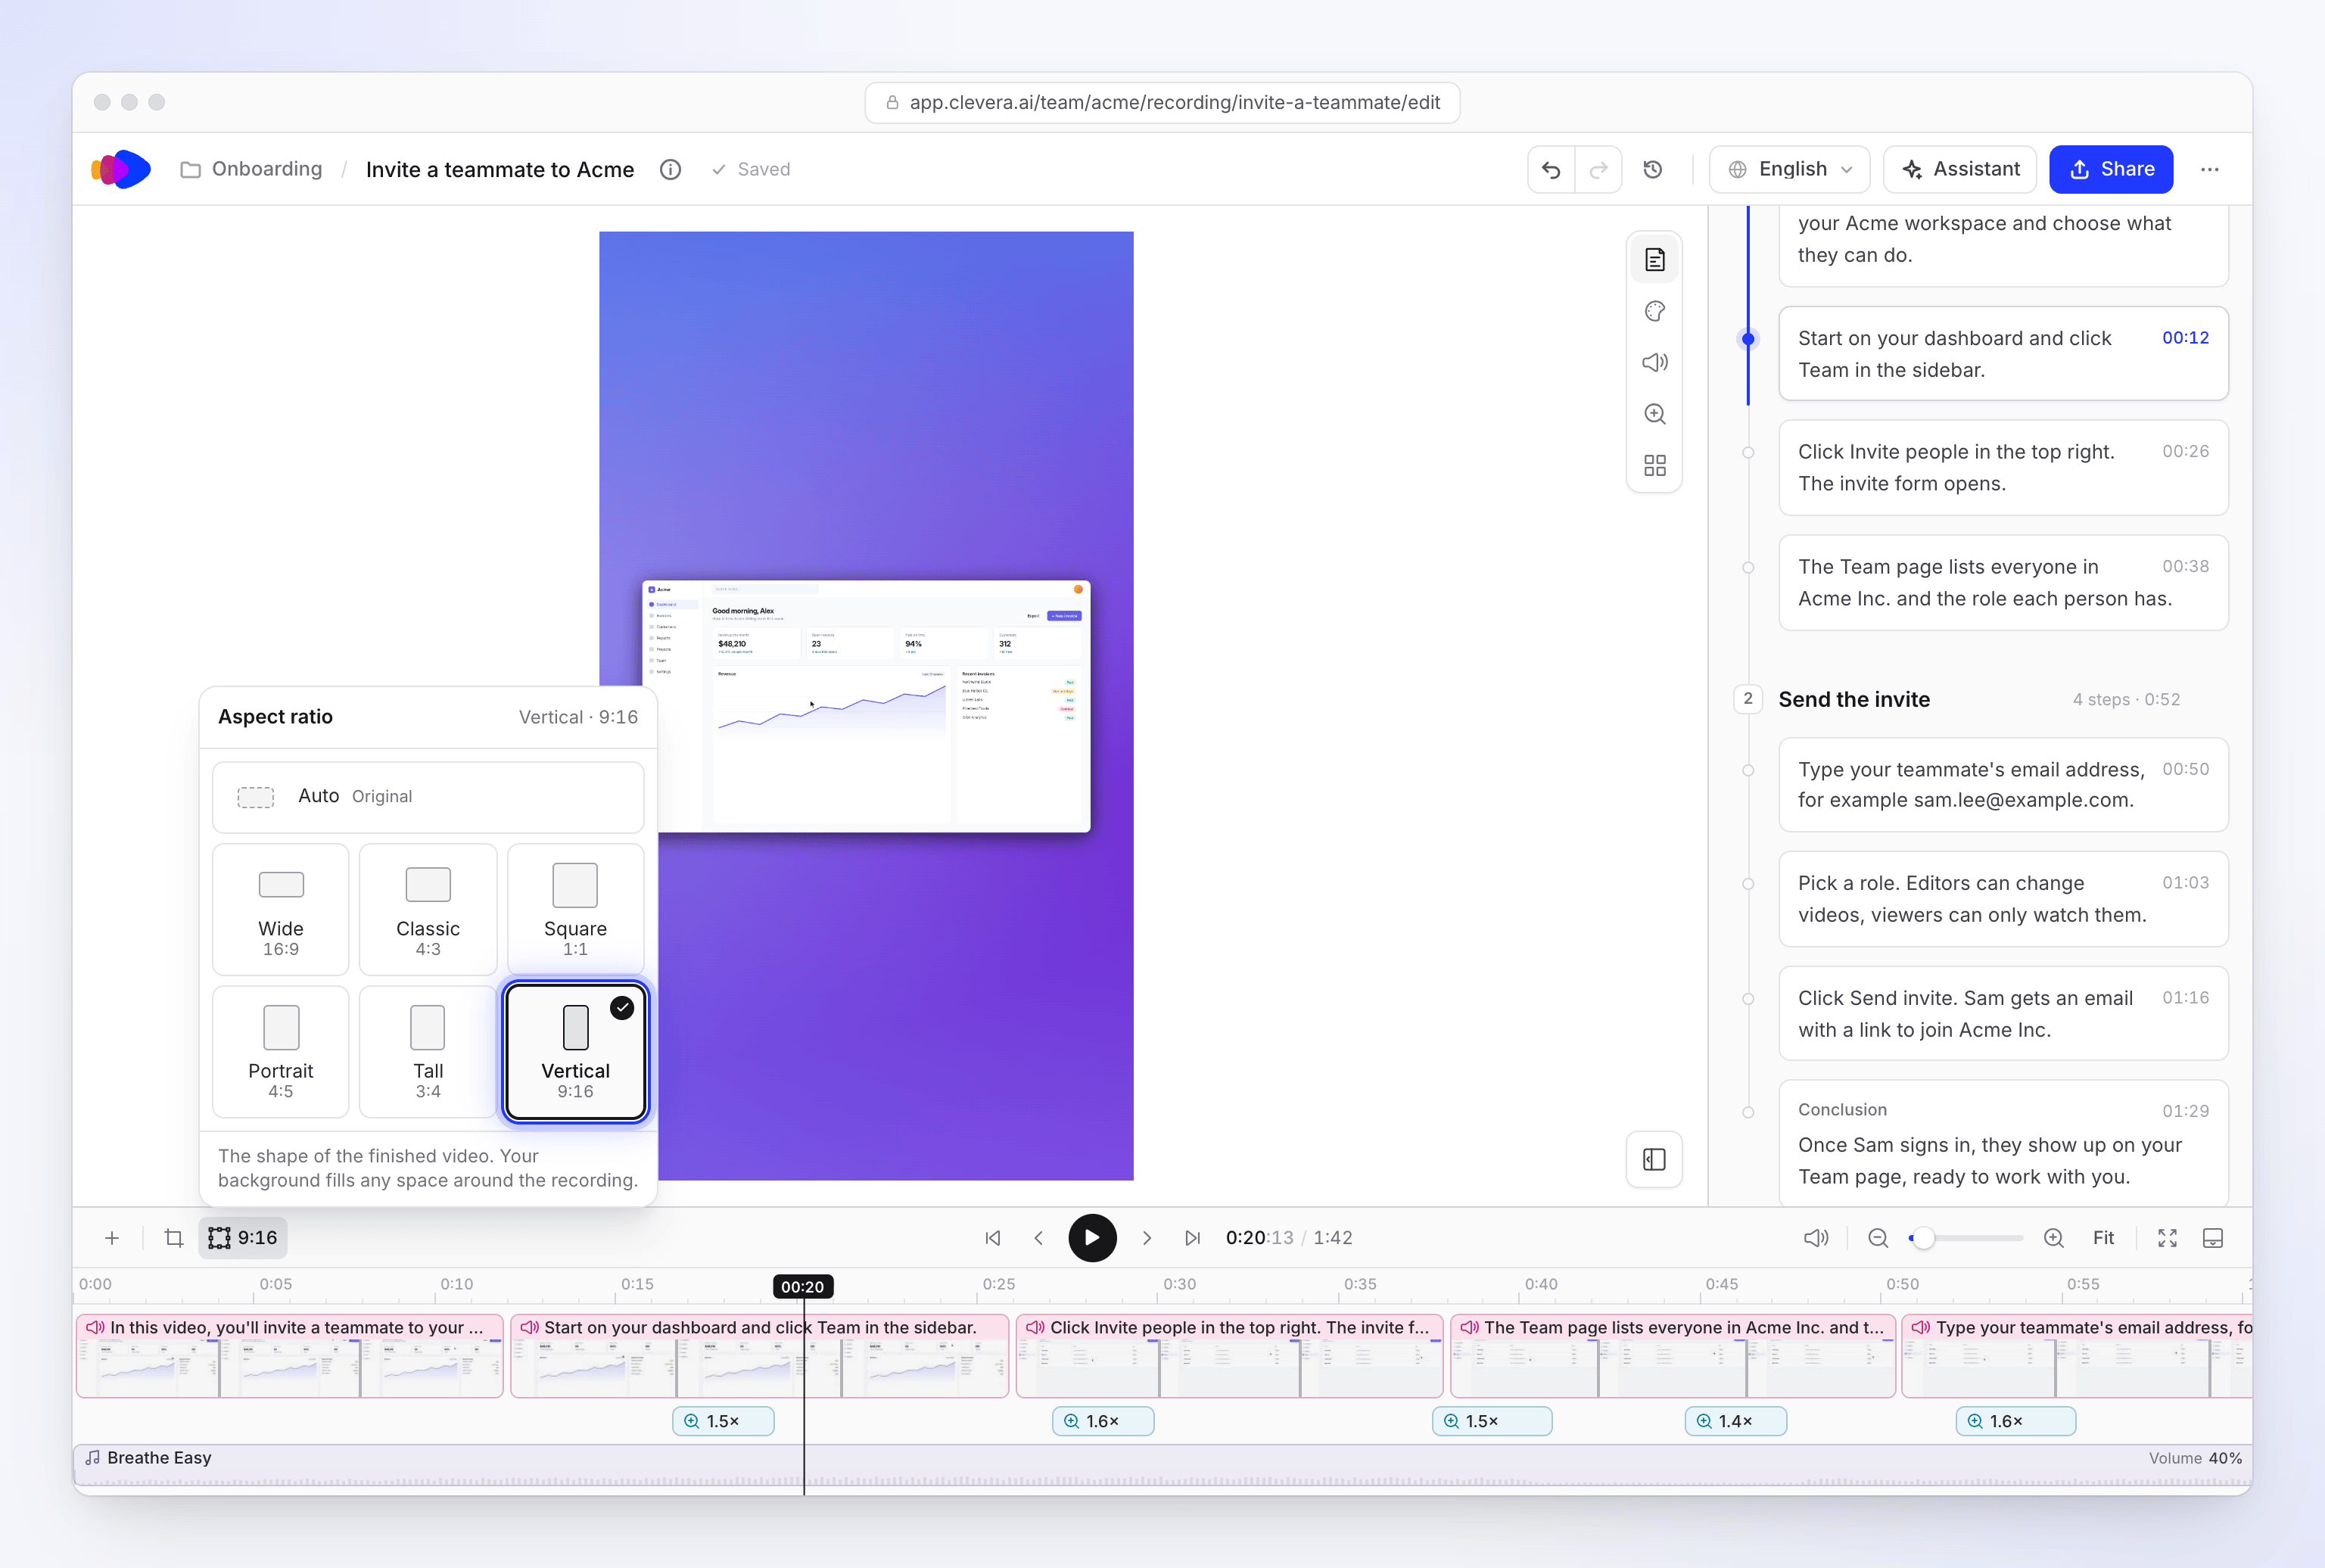
Aspect ratio sets the shape of the finished video: "The shape of the finished video. Your background fills any space around the recording."
| Option | Ratio |
|---|---|
| Auto (default) | The recording's own shape, after any crop |
| Wide | 16:9 |
| Square | 1:1 |
| Classic | 4:3 |
| Vertical | 9:16 |
| Tall | 3:4 |
| Portrait | 4:5 |
Changing it doesn't cut or stretch the recording. It stays centered at its own shape, and the background from the Style tab fills the space around it. A wide recording in Vertical therefore shows as a band across the middle; zooms help it fill the frame.
Crop video cuts the recording itself: "Keep the part of the recording you want to show. The crop applies to every language." Drag the crop box or pick Free, Original, 16:9, 1:1, 9:16 or 4:5, then Save crop. The button shows a dot once a crop is set. It's available for recordings from the desktop app and uploaded videos.