

Record an iPhone or iPad
Record the screen of an iPhone or iPad connected to your Mac with a USB cable: requirements, the Camera permission, trusting the Mac, the iPhone/iPad tile, sound, rotation, what's captured, limits and every message you may see. Mac only.
With Clevera for Mac you can record the screen of an iPhone or iPad connected with a USB cable and talk over it with your Mac's microphone. The recording uploads to your workspace like any other, ready to become a how-to video, a product demo or an article.
Before you start
| You need | Details |
|---|---|
| A Mac with Clevera | macOS 12.3 or later, signed in and set up. See Install the Clevera desktop app. |
| A USB cable that carries data | Some cables only charge. Connect the device straight to your Mac, not through a hub. Wi-Fi doesn't work. |
| Clevera's Camera permission | macOS treats a connected iPhone or iPad as a camera, so Clevera needs camera access to see its screen. macOS asks the first time you click Start recording. See Grant the permissions Clevera needs to record. |
| An unlocked, trusted device | Unlock it. If it asks "Trust This Computer?", tap Trust and enter your passcode. Keep it unlocked while you record. |
| Microphone permission (optional) | Only if you want to talk over the recording. |
Screen Recording, Accessibility and Input Monitoring aren't needed for an iPhone or iPad recording: Clevera records the device's screen, not your Mac's.
Record your iPhone or iPad
Connect the device
Connect the iPhone or iPad to your Mac with the cable and unlock it. If it asks whether to trust this Mac, tap Trust and enter your passcode.
Choose iPhone/iPad in the recorder
Open the recorder and click iPhone/iPad (⌘4). For a moment the card says "Looking for your iPhone or iPad…". When it finds the device, the card shows the device's name and "Connected with a cable". If the name doesn't say iPhone or iPad, Clevera adds it, for example "Work phone · iPhone".
With more than one device connected, click Change to pick one. Clevera remembers the device you used last.
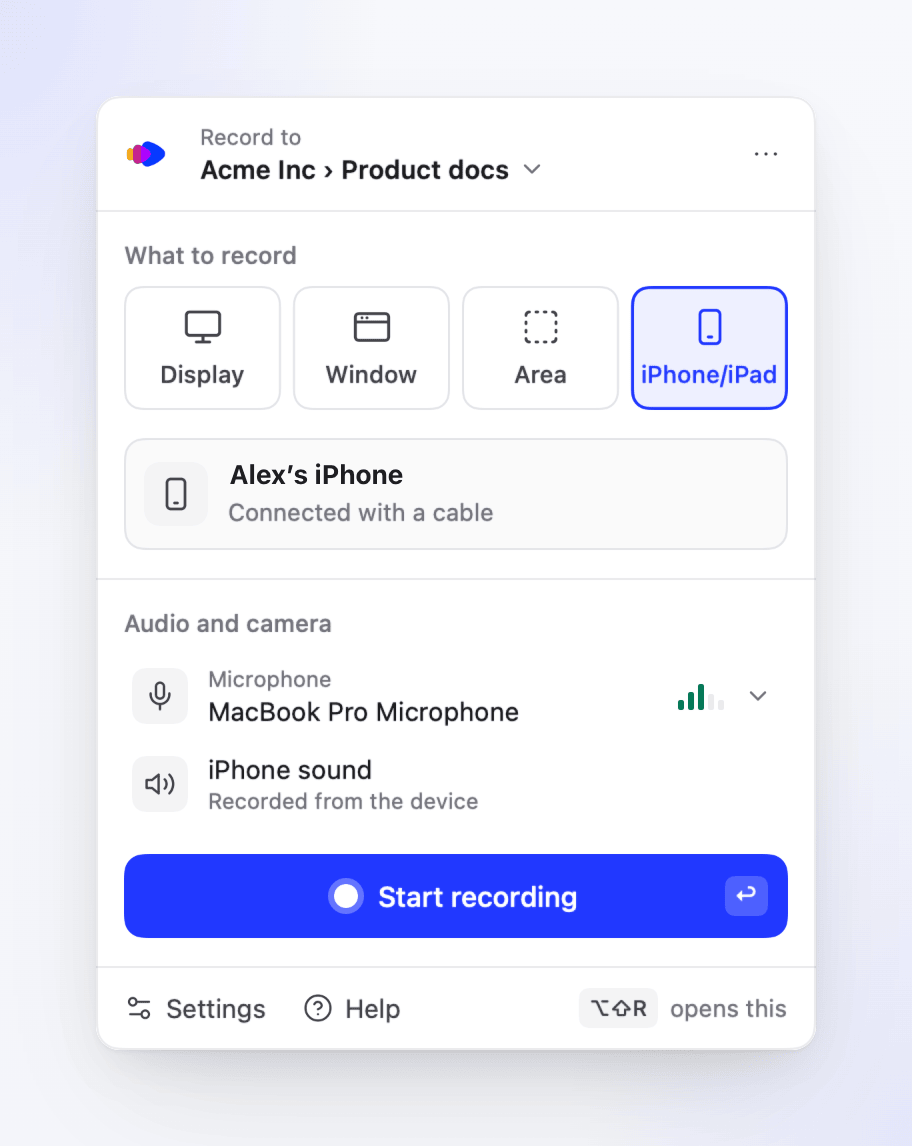
The iPhone sound row replaces the camera and system audio rows. Check the sound
Under Audio and camera, choose your Mac's microphone if you want to talk over the recording. The device's own sound is always recorded when the device plays any: the row iPhone sound (or iPad sound) says "Recorded from the device" and can't be turned off.
Start recording
Click Start recording. The countdown appears on the display your pointer is on, for example "Recording Alex's iPhone · use it when this ends". When it ends, use your iPhone or iPad as you normally would. With Settings → Recording → Countdown set to Off, recording starts right away.
Stop
Click Stop on the recording bar, or press ⌥⇧S. The upload card shows, for example, "iPhone recording from 26 Oct, 14:02", and the recording uploads like any other. See Find your recording after it uploads.
What's different from a screen recording
| iPhone or iPad recording | |
|---|---|
| Picture | The device's own screen at its own resolution (up to 4096 pixels on the long side, so even the largest iPad records at full size). |
| Sound | The device's sound, plus your Mac's microphone if it's on. |
| Taps and typing | Not recorded. Clevera only gets the picture from the device, so there are no click steps, no typed text and no zooms that follow your clicks. The AI works from the video and your voice. |
| Camera bubble | Not available. |
| System audio | Not available; the device's sound replaces it. |
| Recording bar | Pause, Stop, Delete recording… and Notes work, and the bar shows the device's name. There's no Restart…, and the restart shortcut does nothing. |
| Rotation | The video keeps the shape of the orientation you started in. If you turn the device, the other orientation is scaled to fit inside that frame, with black bars. |
| Your Mac | Clevera keeps your Mac awake while it records. |
If the device locks or its screen turns off during a recording, the recording keeps going and shows the last picture until the screen comes back. Keep it unlocked so the video doesn't freeze.
Limits
| Limit | What happens |
|---|---|
| 60 minutes of recorded time | At 55:00 the bar says "5 minutes left. Recording stops and uploads at 60:00." At 60:00 Clevera stops and uploads ("Stopped at the 60-minute limit."). Paused time doesn't count. |
| Under 2.5 seconds | The recording is thrown away: "That was too short to save." |
| Disk space | The same warnings as a screen recording. See Record your screen or a display. |
If the recording is interrupted
If the cable comes out, macOS stops the capture or your Mac goes to sleep, Clevera keeps everything recorded so far. The video is saved to your Mac as you record, so at most the last moment is lost. The upload card says We kept your recording with the reason, "Everything recorded is saved. Upload it, or delete it if you don't need it.", and an Upload button.
| Reason on the card | What it means |
|---|---|
| "Your iPhone was disconnected, so the recording stopped." | The cable came out or the connection dropped. Check the cable and connect it straight to your Mac. |
| "Your Mac went to sleep, so the recording stopped." | Keep your Mac awake while you record, for example don't close the lid. |
| "macOS stopped the recording of your iPhone or iPad (…)." | macOS ended the capture. Disconnect the device, connect it again and record again. |
| "Clevera couldn't keep saving the video (…)." | Often a full disk. Free up space. |
| "The video couldn't be finished cleanly, so the last moments may be missing." | The end of the video may be cut short. The rest uploads normally. |
See Recover a recording that didn't finish uploading.
Messages in the recorder
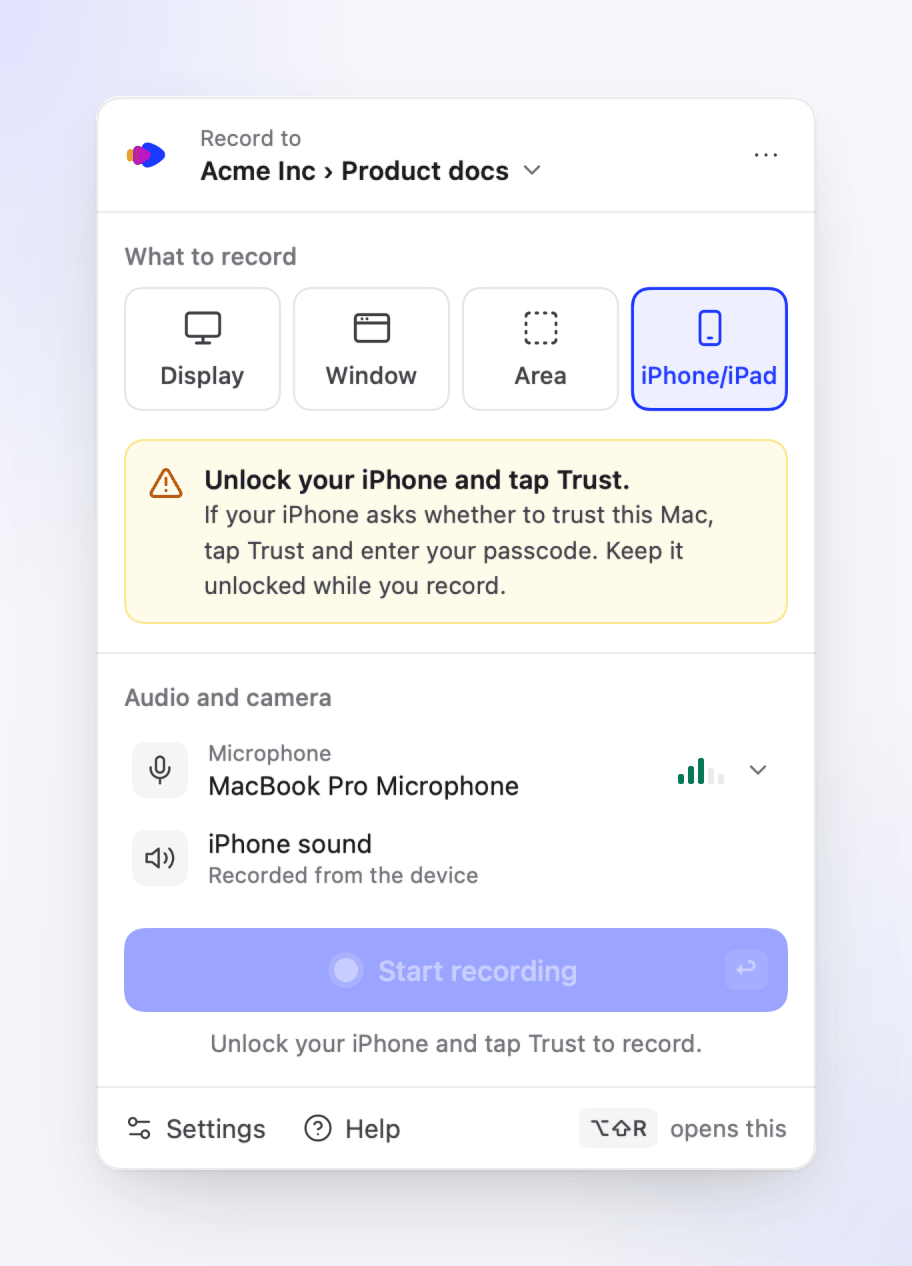
| Card says | What to do |
|---|---|
| "Connect your iPhone or iPad with a USB cable." | Connect it. "If it's already connected, try another cable (some only charge) and connect it straight to your Mac, not through a hub." |
| "Unlock your iPhone and tap Trust." | Unlock the device. If it asks whether to trust this Mac, tap Trust and enter your passcode. Clevera can't tell a locked device from one that hasn't trusted this Mac yet, so one message covers both. |
| "Camera access is off" | "macOS treats a connected iPhone or iPad as a camera. Turn on Clevera in Privacy & Security › Camera." Click Open System Settings. |
While something is missing, Start recording is off and the caption under it says why: "Connect an iPhone or iPad to record.", "Unlock your iPhone and tap Trust to record." or "Turn on camera access to record."
Troubleshooting
If a recording can't start, the countdown card says Couldn't start recording with the reason and "Nothing was recorded. Try again, or copy the details for support." Click Try again, or Copy details to send to support.
| Reason | What to do |
|---|---|
| "Clevera can't find your iPhone or iPad. Check that it's connected and unlocked." | Reconnect the cable and unlock the device. |
| "Clevera isn't getting a picture from your iPhone. Unlock it, keep the screen on and try again." | Clevera waits up to 10 seconds for the first picture. Unlock the device, keep its screen on, and start again. |
| "Clevera needs camera access to record your iPhone or iPad. …" | Turn on Clevera in System Settings → Privacy & Security → Camera. |
| "Clevera couldn't start recording your iPhone or iPad (…). Disconnect it, connect it again and try once more." | Unplug the device, plug it back in, and start again. |
| "Recording an iPhone or iPad isn't available for your account yet." | Make sure Clevera is up to date (Settings → Updates). If it still appears, contact support. |
| "Finish the current recording before starting a new one." | Stop the recording that's running first. |
| The device isn't listed at all | Try another cable, connect straight to your Mac, unlock the device and tap Trust. |
| Parts of the screen are black | Some apps and videos block screen recording on iPhone and iPad, and they show as black in any recording. Clevera can't record them. |
| No sound from the device | The device's sound is recorded only when it plays sound. Check that it isn't muted and that its volume is up. |
| No narration | The upload card says "The microphone audio couldn't be saved, so this recording has no narration." Check your Mac's microphone and Microphone permission, then record again. |