

Grant the permissions Clevera needs to record
Turn on the permissions Clevera needs to record: Screen Recording, Accessibility and Input Monitoring on a Mac, Screen Recording and Mouse & Keyboard Capture on Windows, plus Microphone and Camera if you use them. Fix a permission that won't stick.
Clevera needs a few permissions before it can record your screen and your clicks, plus two optional ones for your microphone and camera. On a Mac you turn on three macOS permissions. On Windows there's usually nothing to grant for the screen and input; you only allow the microphone and camera if you use them. This article explains each permission, why Clevera needs it and how to turn it on.
What each permission is for
| Permission | Required? | Why Clevera needs it |
|---|---|---|
| Screen Recording | Required | To capture what's on your screen. Capture only happens while a recording is in progress. |
| Accessibility | Required | To read your mouse clicks and keyboard context, so the AI can add zooms, click highlights and accurate captions. |
| Input Monitoring | Required | To capture keystrokes reliably, even inside apps that protect their input. Without it, text you type can be missed. |
| Microphone | Optional | To record your voice, which gives the AI context to narrate and caption your video. |
| Camera | Optional | To record your webcam as a separate video track. |
You can't record on a Mac without the three required permissions.
| Permission | Required? | Why Clevera needs it |
|---|---|---|
| Screen Recording | Required | To capture what's on your screen. On Windows 11 and recent Windows 10 builds (20348 and later) Windows can ask you to allow it. On older Windows 10 versions there's nothing to grant. |
| Mouse & Keyboard Capture | Required | To read mouse movements, clicks, drags and keys, so the AI can add zooms, click highlights and accurate captions. Windows allows this automatically for normal user accounts; no administrator rights needed. |
| Microphone | Optional | To record your voice, which gives the AI context to narrate and caption your video. |
| Camera | Optional | To record your webcam as a separate video track. |
Security software, a Remote Desktop session or a company Group Policy can block Mouse & Keyboard Capture. If the row doesn't turn Enabled, check those first.
You can record without a microphone or camera. To learn what Clevera does with what it captures, see Understand what the desktop app captures.
Turn on the permissions
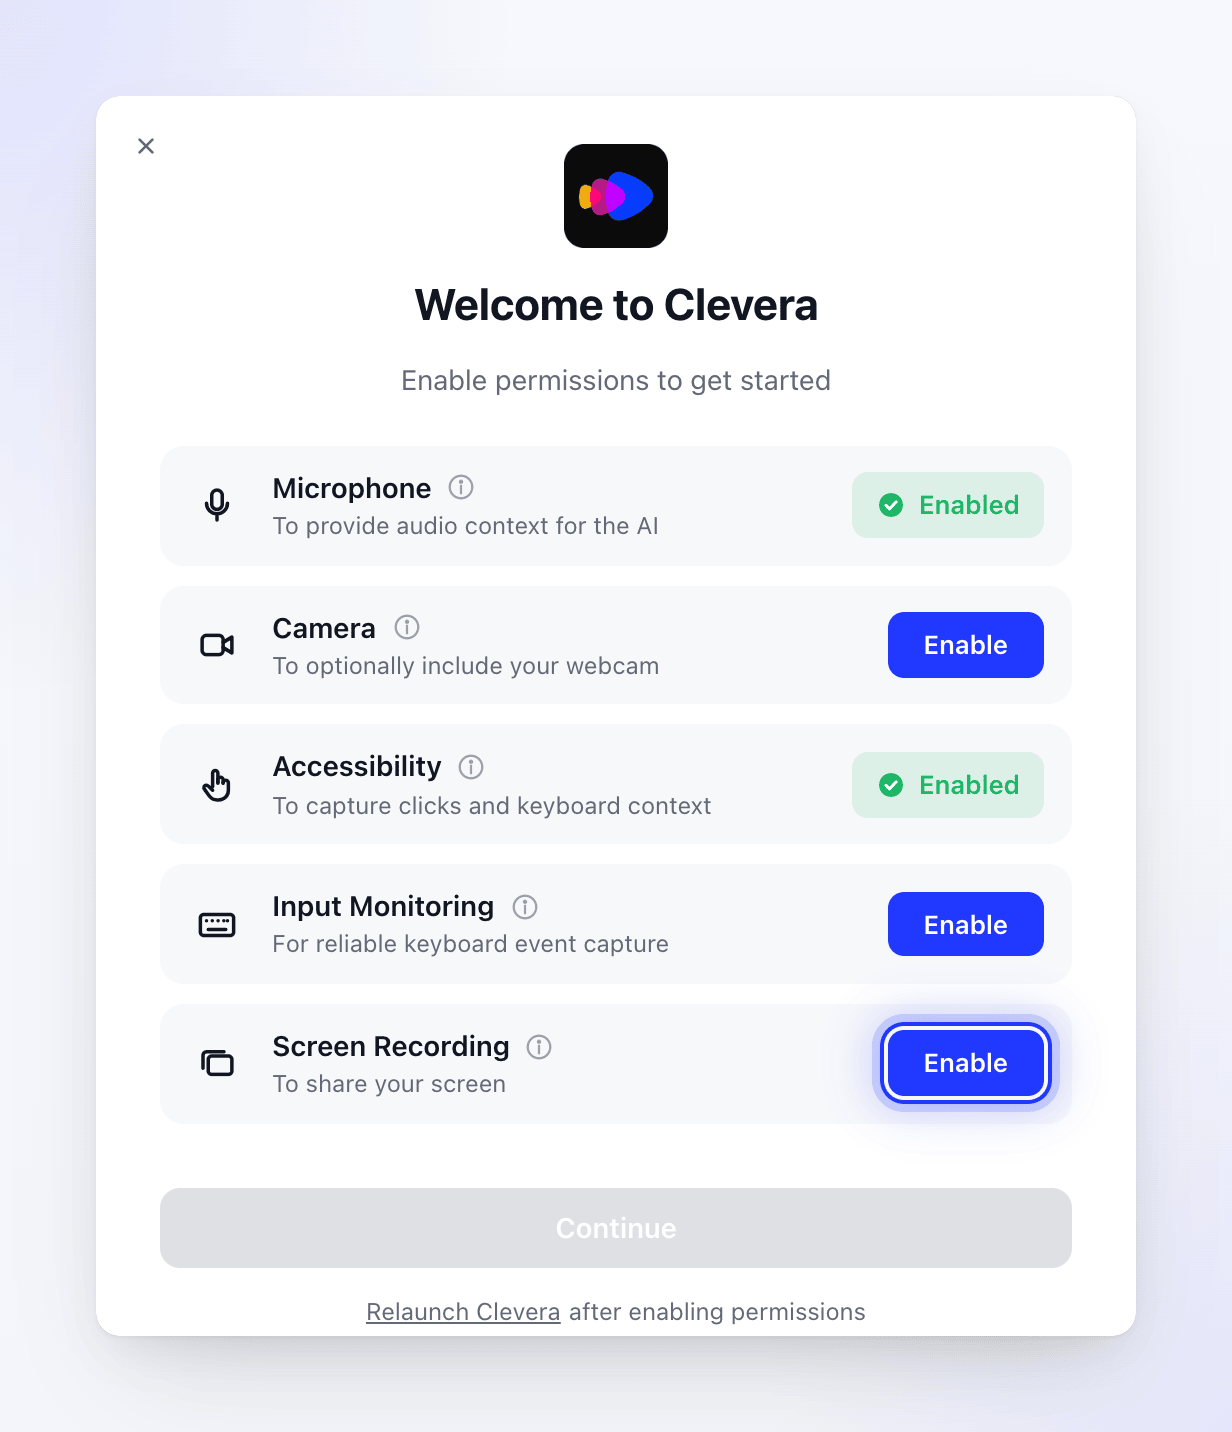
After you sign in, Clevera opens the window Welcome to Clevera — Enable permissions to get started whenever a required permission is missing. Each row has an Enable button. When a permission is on, the button turns into a green Enabled chip. Hover the ⓘ next to a row to read why Clevera needs it.
Enable Microphone and Camera (optional)
Click Enable next to Microphone and Camera if you plan to use them. The first time, macOS shows its own prompt; click Allow (or OK). If you previously denied access, Clevera opens System Settings → Privacy & Security → Microphone (or Camera) instead; turn Clevera on there.
Enable Accessibility
Click Enable next to Accessibility. macOS asks you to open System Settings. In Privacy & Security → Accessibility, turn Clevera on. You may need to enter your Mac password or use Touch ID.
Enable Input Monitoring
Click Enable next to Input Monitoring. Clevera opens Privacy & Security → Input Monitoring. Turn Clevera on. If Clevera isn't in the list, click +, choose Clevera from Applications and click Open.
Enable Screen Recording
Click Enable next to Screen Recording. Clevera asks macOS for access and opens Privacy & Security → Screen Recording (called Screen & System Audio Recording on newer macOS). Turn Clevera on.
Relaunch Clevera if asked
macOS may say Clevera must quit and reopen before the change takes effect. Choose Quit & Reopen, or quit Clevera yourself and open it again. The window re-checks every second, so rows turn Enabled as soon as macOS reports them.
Click Continue
Continue becomes available once all three required permissions are on. The recording window opens.
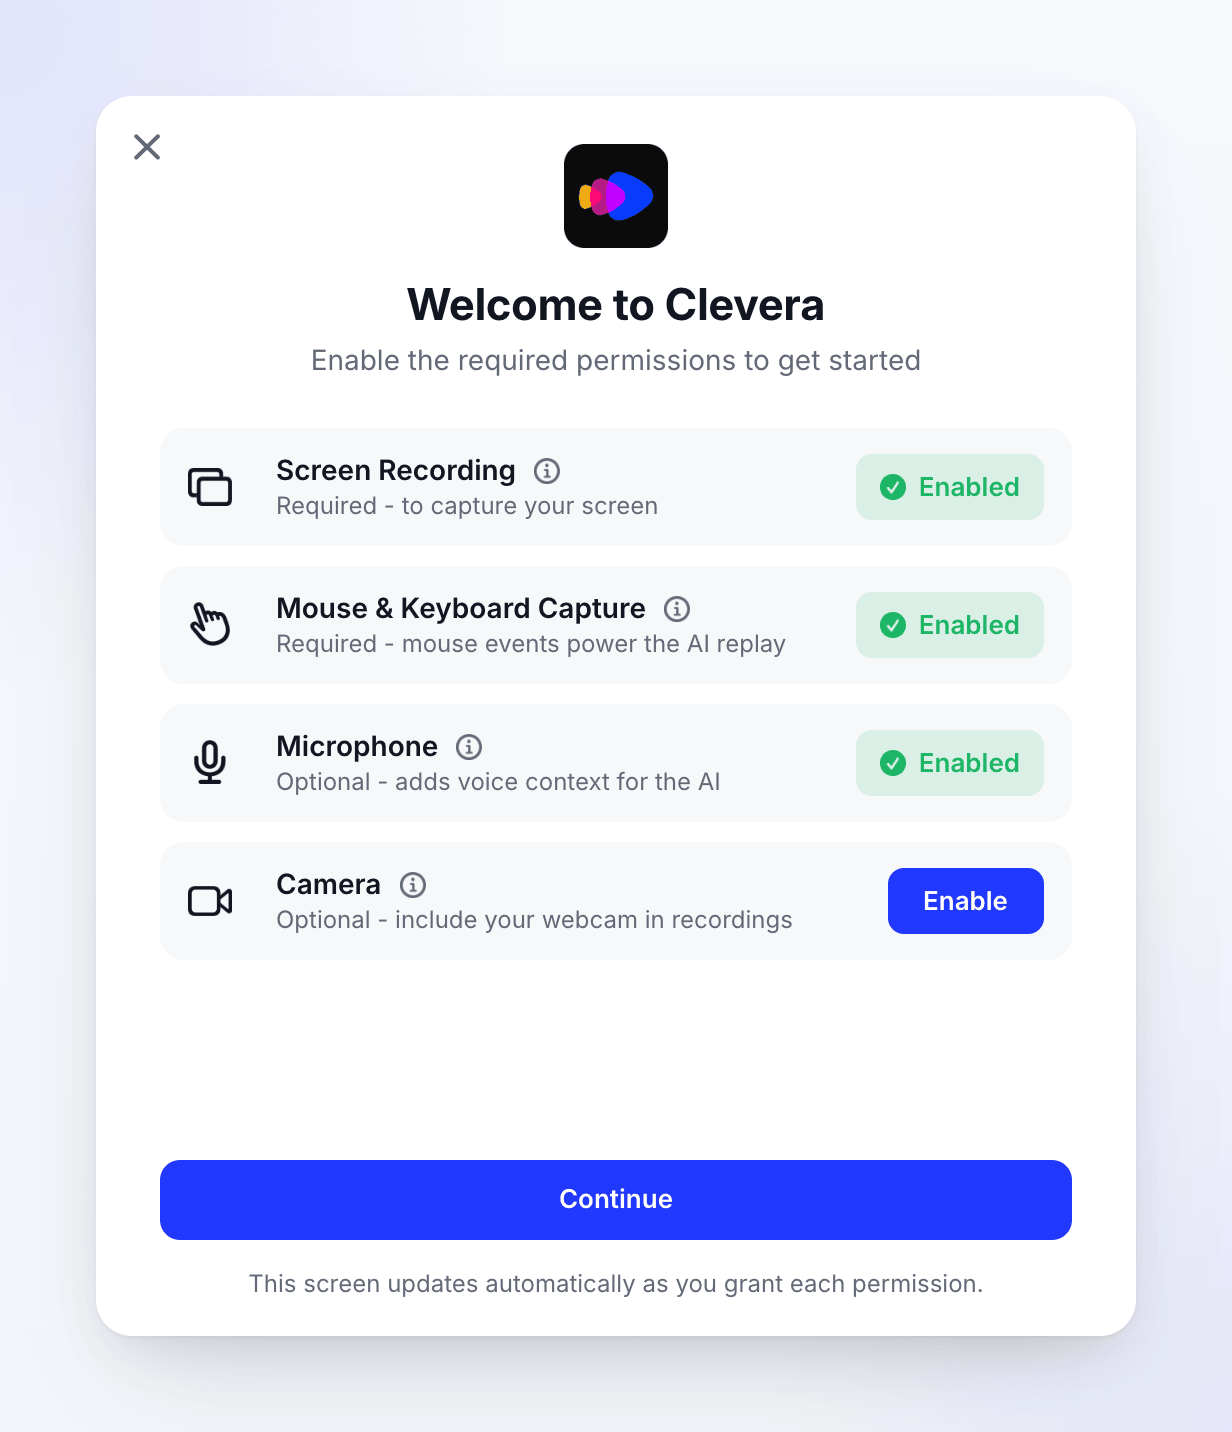
After you sign in, Clevera opens the window Welcome to Clevera — Enable the required permissions to get started whenever a required permission is missing. Each row has an Enable button that turns into a green Enabled chip. Hover the ⓘ next to a row to read why Clevera needs it. The window says "This screen updates automatically as you grant each permission."
Check Screen Recording and Mouse & Keyboard Capture
On most PCs both rows already show Enabled. If Screen Recording shows Enable, click it and allow Clevera when Windows asks. If you denied it before, Clevera offers to open the Windows screen capture privacy settings, where you can allow it.
Enable Microphone and Camera (optional)
Click Enable next to Microphone or Camera. Clevera opens Settings → Privacy & security → Microphone (or Camera). Turn on Microphone access (or Camera access) and Let desktop apps access your microphone (or camera). On Windows 10 these pages are under Settings → Privacy.
Click Continue
Continue becomes available once the two required rows are on. The recording window opens.
Check or change permissions later
- Open the permissions window any time from More → Permissions in the recording window, or from the Clevera menu → Permissions.
@tab Windows
- Open the permissions window any time from More → Permissions in the recording window, or right-click the Clevera icon in the notification area (system tray) → Permissions.
- Every time the recording window opens, Clevera checks the required permissions again. If one is missing, it shows the permissions window instead of the recording window.
- If the microphone or camera permission is off, its row in the recording window says Permission required. Click the row to open the permissions window.
Troubleshooting
Permission is on but Clevera still can't record
This is the most common problem on a Mac, usually after an update or after moving the app. macOS keeps an old entry for Clevera that no longer matches the app.
- Quit Clevera.
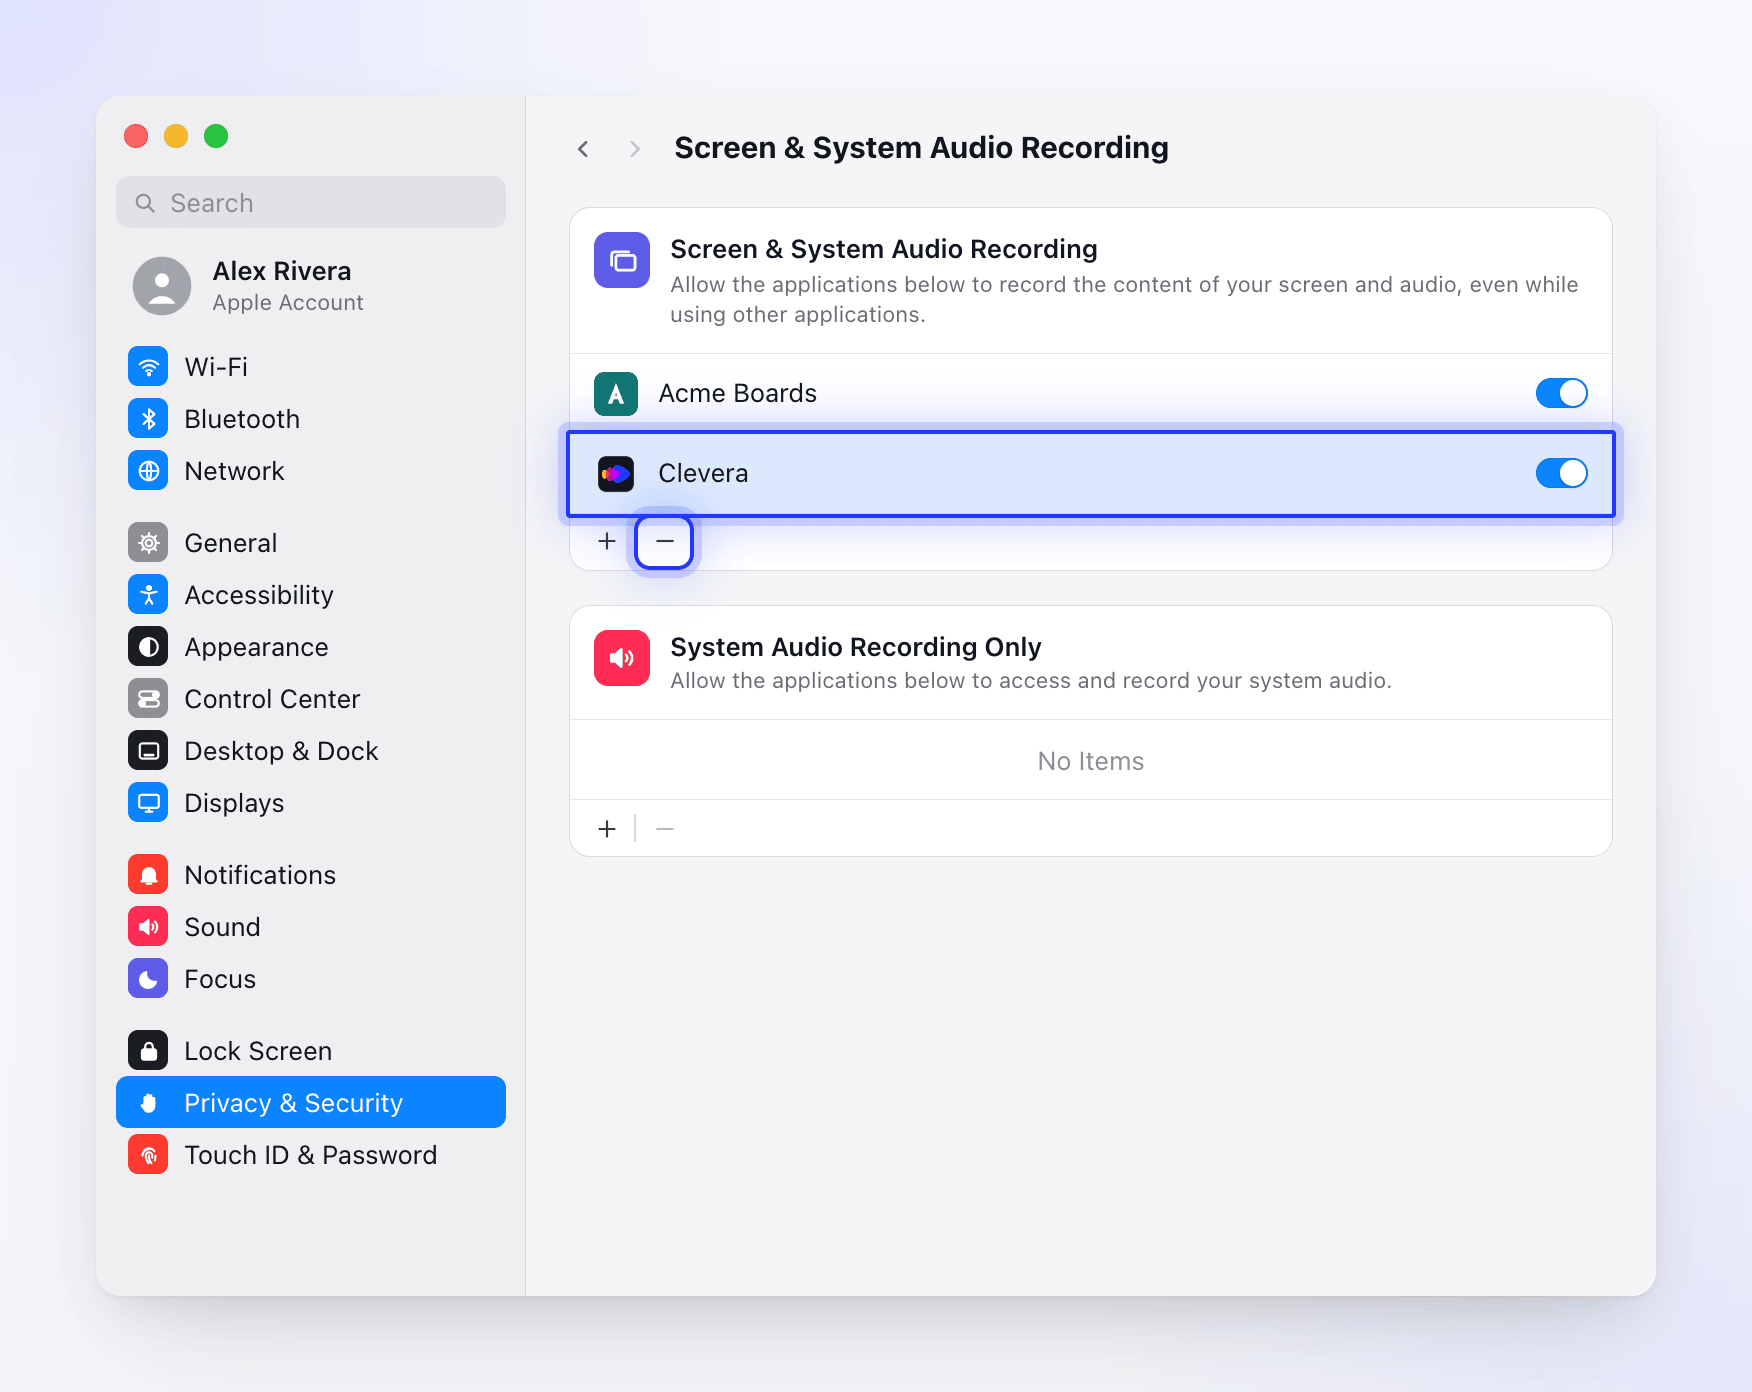
- Open System Settings → Privacy & Security → Screen Recording.
- Select Clevera and click − to remove it.
- Click +, choose Clevera from Applications and turn it on.
- Do the same for Accessibility and Input Monitoring if recording still fails.
- Open Clevera again.
- Quit Clevera (right-click the tray icon → Quit) and open it again.
- If Mouse & Keyboard Capture still isn't enabled, check whether security software, a Remote Desktop session or a company policy blocks apps from reading input. Ask your IT team if you're on a managed PC.
- If recording fails with a permission message, open More → Permissions and allow whatever the window asks for.
Clicks in some windows aren't captured (Windows)
If you record an app that runs as administrator, Windows doesn't let a normal app read clicks and keys inside it. Clevera keeps recording and shows Input Event Capture Limited. The message mentions restarting Clevera as administrator from Settings > Permissions, but there is no such option. To capture those clicks, quit Clevera, then right-click Clevera in the Start menu and choose Run as administrator, or run the other app without administrator rights.
Error messages
On a Mac, these appear in a Recording Error alert; click Copy Details to send the details to support. On Windows, error boxes end with "Would you like to copy error details to clipboard?"; click Yes to copy them.
| Message | What to do |
|---|---|
| "Screen capture permission is required for recording" | Turn on Screen Recording for Clevera, then try again. |
| "Accessibility permission is required for recording" (macOS) | Turn on Accessibility for Clevera, then try again. |
| "Required permissions are not granted" | Open More → Permissions and enable the required permissions. |
| Permission Required (Windows) | The message names the permission. Open More → Permissions and allow it. |
| "Unable to verify screen recording permission" (macOS) | Remove Clevera from Screen Recording, add it again, then relaunch. See the steps above. |
| "Screen content is unavailable" (macOS) | Usually the Screen Recording permission needs to be re-granted. Remove Clevera from Screen Recording, add it again and restart the app. |
For other problems, see Clevera can't record my screen.