

Record a window or a custom area
Record a single window or a part of your screen with the Clevera desktop app, resize a window to a standard size such as 1920 × 1080 before you record, and fix window and area errors.
Recording one window or one area keeps the video focused and the file small. Everything outside it stays out of the recording, so other apps, notifications and your desktop don't appear. This article covers picking a window, resizing it to a standard size, and drawing a custom area.
To record the whole screen or an app, see Record your full screen, a display or an app.
Record a window
Open the window list
In the recording window, click the top row, then click Specific window. A list of open apps appears, each with how many windows it has open. On a Mac you see Loading applications... while the list loads.
Pick the window
Click an app. If it has more than one window, its windows appear under Windows in followed by the app's name, each with its title and size. Click the window you want.
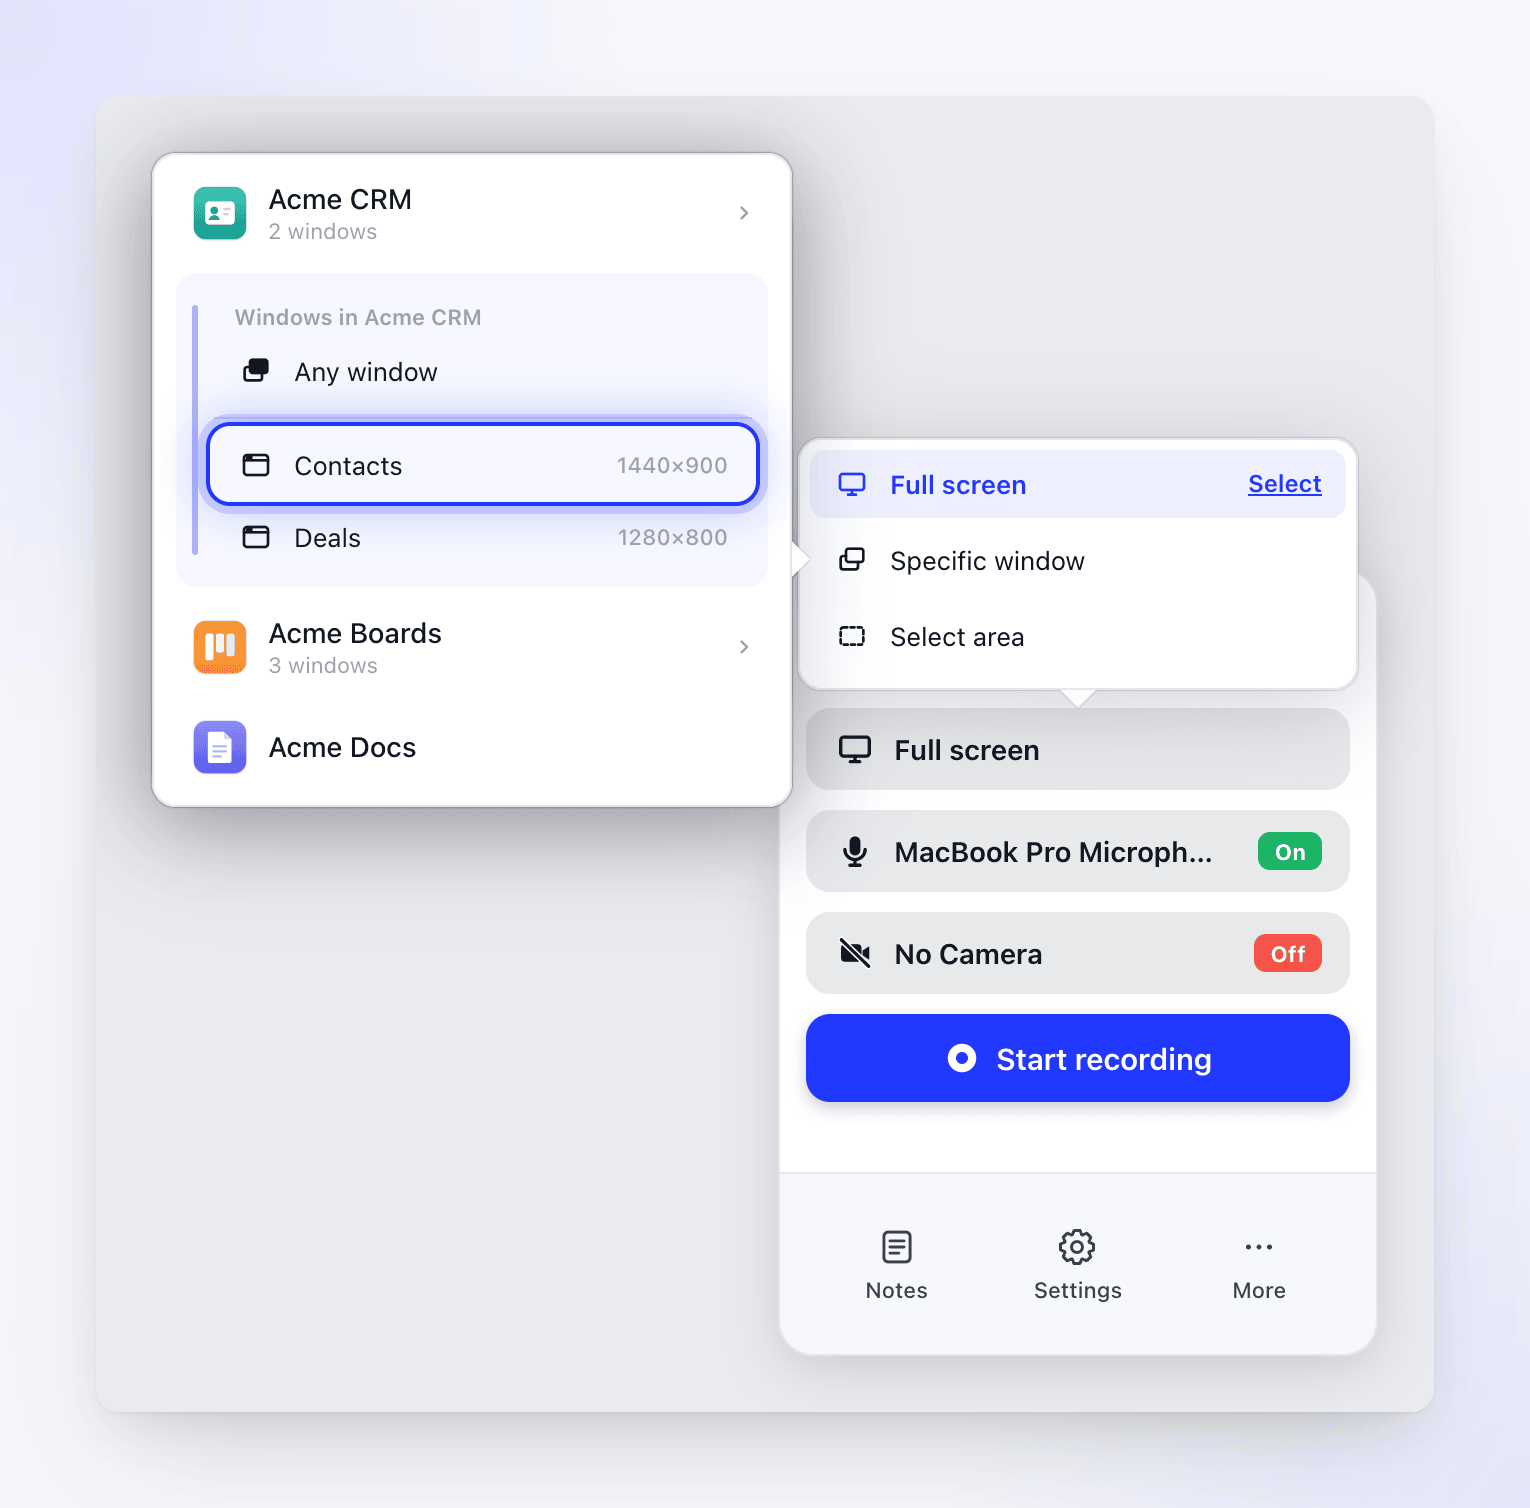
To let Clevera choose, click Any window. On a Mac it records the app's largest window at the moment you start; on Windows it records the first window in the app's list.
The top row now shows what you picked. On a Mac it shows the app and window title, for example Acme CRM — Contacts. On Windows it shows the window title only.
Click Start recording
Clevera highlights the window and shows a card with the app's name, the window's size (Window size) and a Resize button. Resize it now if you want a standard size (see below), then click Start recording on the card.
Record
When the countdown ends, Clevera dims everything around the window, so you can see what's in the shot. Only that part of the screen is recorded.
Only windows that have a title and are at least 300 × 300 are listed. Minimized and hidden windows can't be recorded. Clevera finds the window by its title, so if the title changes or the window closes before you start, Clevera records the app's largest window instead. If the app isn't running anymore, it switches back to Full screen. Clevera brings the window to the front when the recording starts.
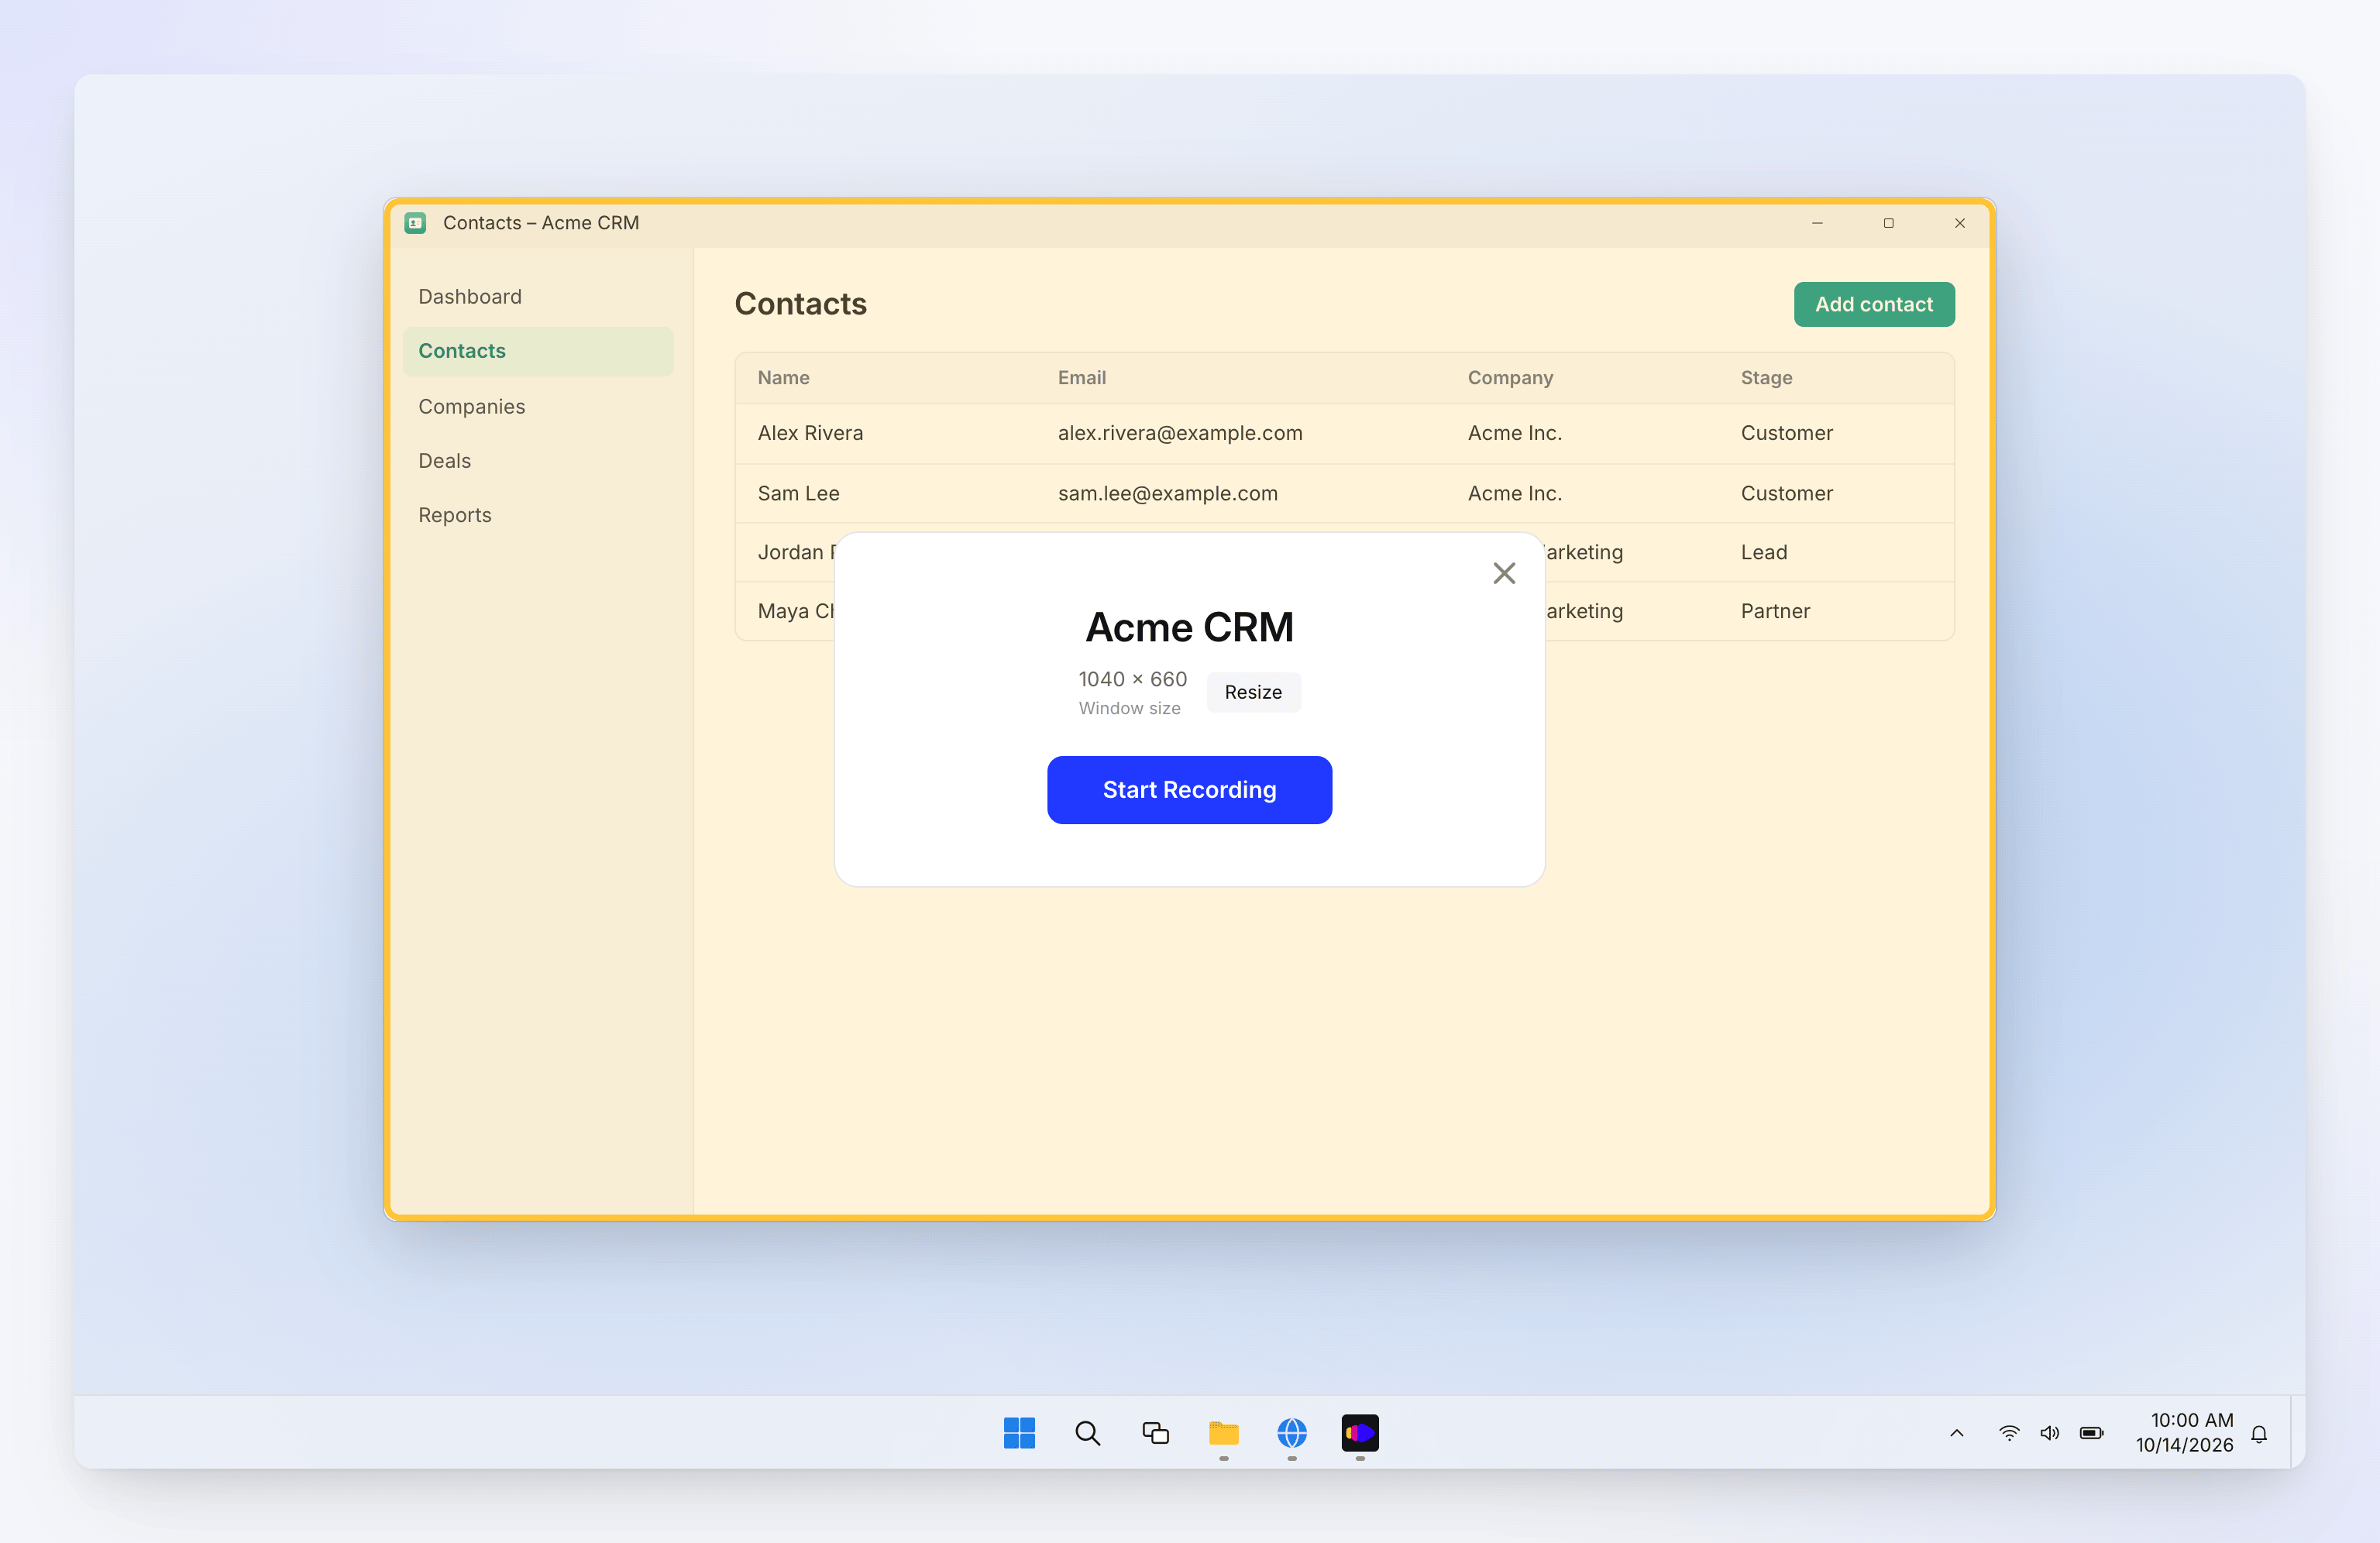
Only windows of at least 300 × 300 are listed. Clevera records the part of the screen where the window was when the recording started:
- If you move the window during the recording, the recording doesn't follow it.
- If another window or a pop-up covers it, that window is in the recording too.
Keep the window in place and in front while you record.
Resize the window
A consistent window size makes videos look tidy and gives the AI a clean frame to zoom in on. Clevera never resizes a window on its own; it only resizes when you choose a size.
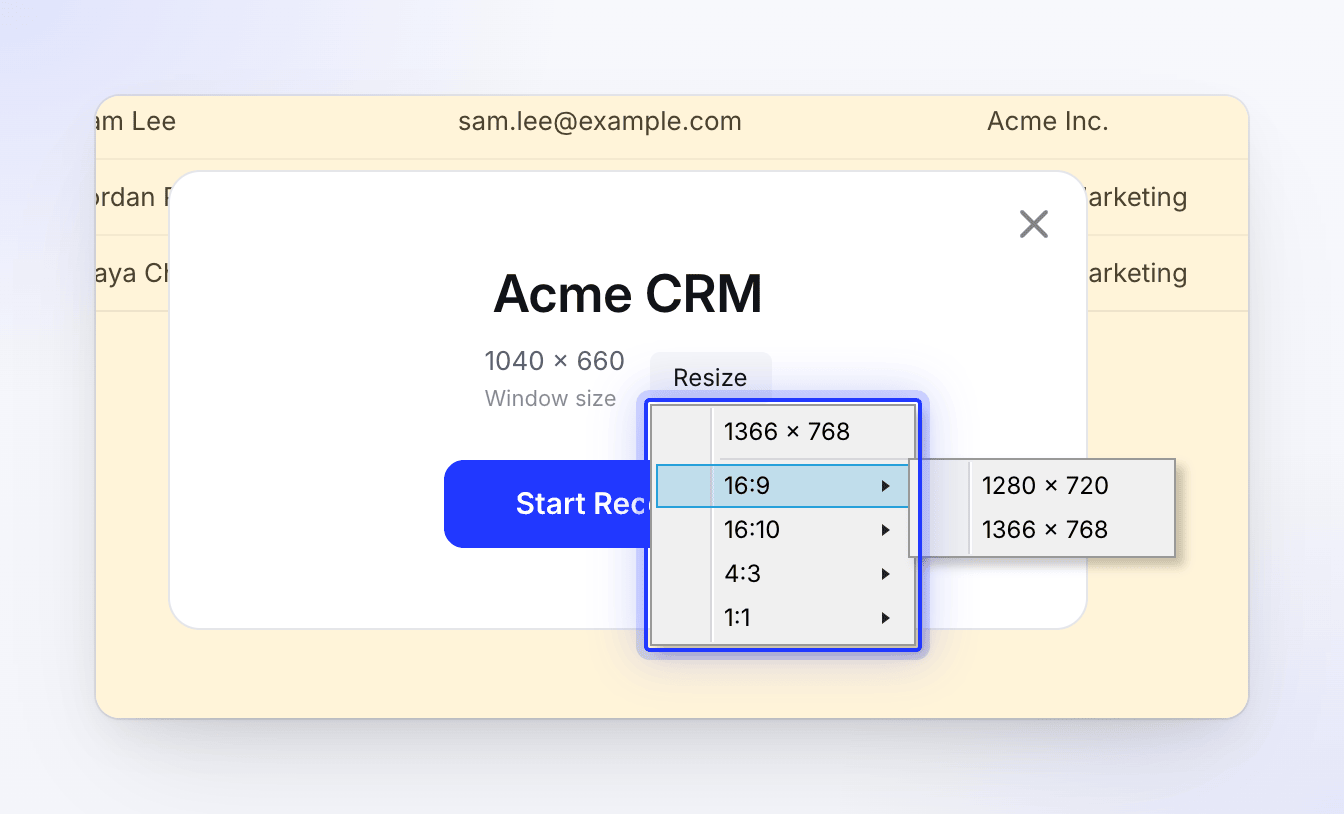
- On the window's card, click Resize.
- Pick a common size at the top of the menu, or open an aspect ratio to see more sizes.
- The window resizes and the card shows the new size. Click Start recording.
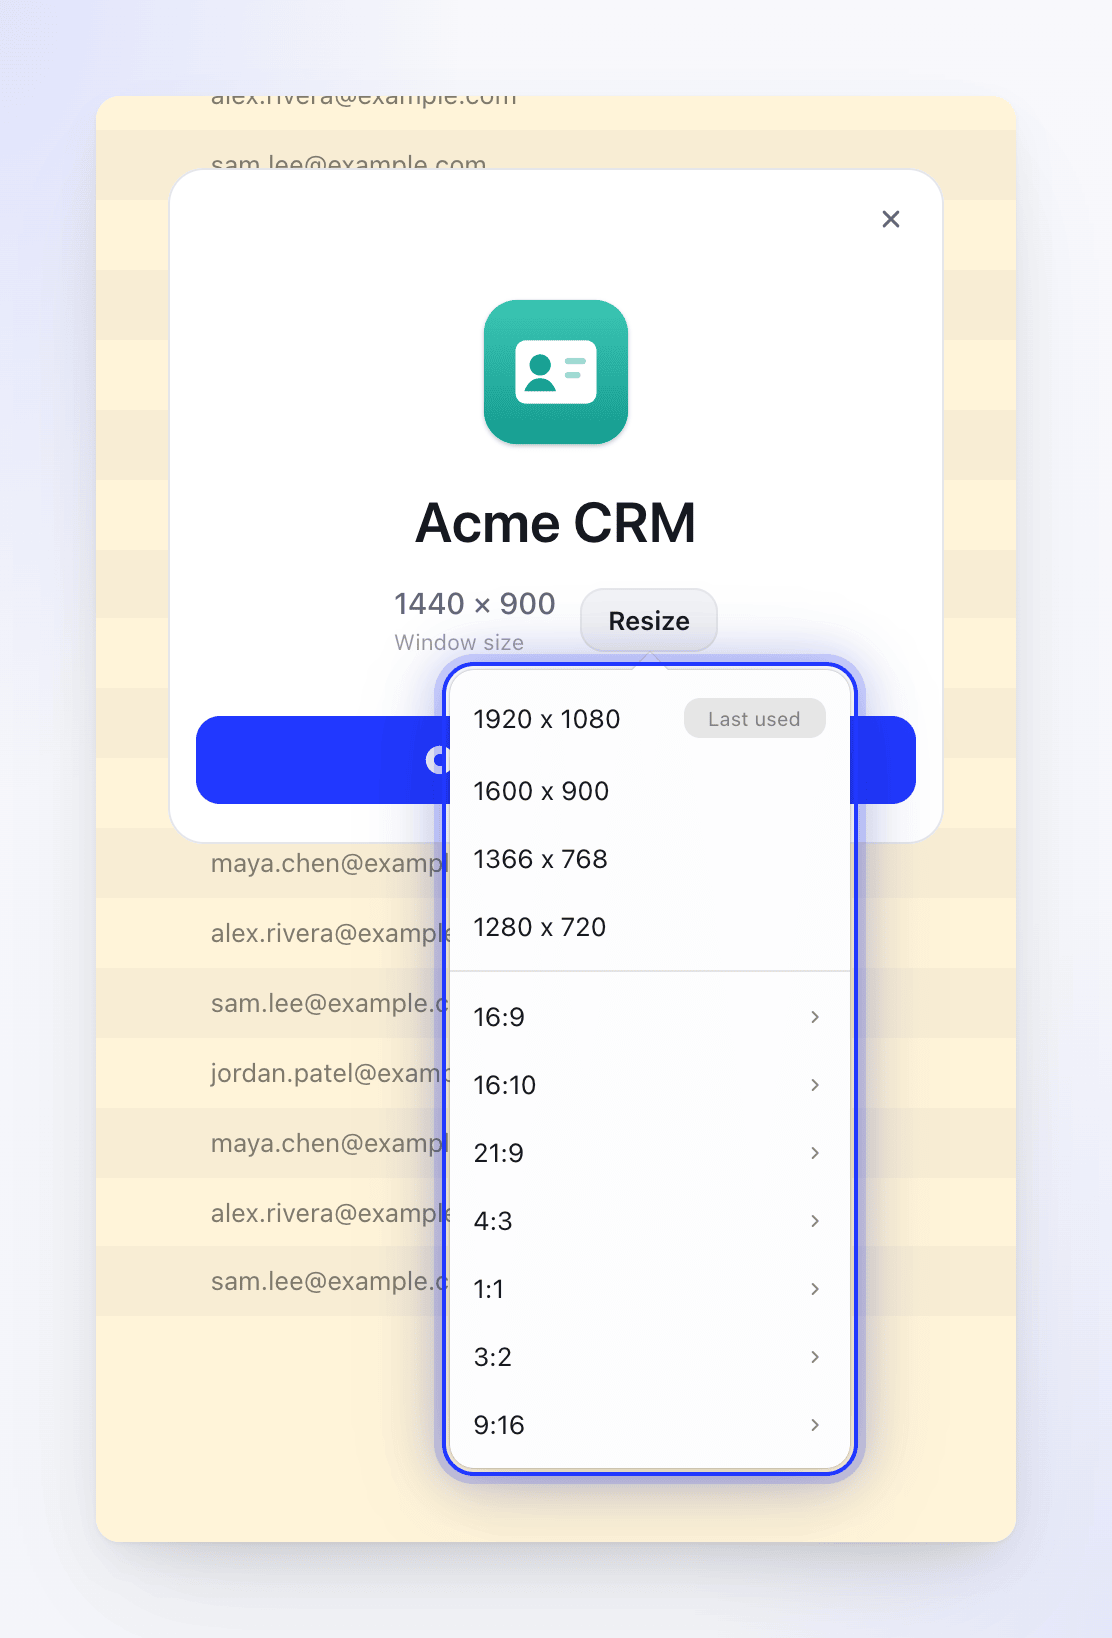
The size you used last is marked Last used. On a new Windows install that's 1920 × 1080.
| Group | Sizes |
|---|---|
| Common | 1920 × 1080, 1600 × 900, 1366 × 768, 1280 × 720 |
| 16:9 | 3840 × 2160, 2560 × 1440, 1920 × 1080, 1600 × 900, 1366 × 768, 1280 × 720, 1152 × 648, 1024 × 576 |
| 16:10 | 2560 × 1600, 1920 × 1200, 1680 × 1050, 1440 × 900, 1280 × 800, 1024 × 640 |
| 21:9 | 3440 × 1440, 2560 × 1080 |
| 4:3 | 2048 × 1536, 1600 × 1200, 1280 × 960, 1024 × 768, 800 × 600 |
| 1:1 | 1600 × 1600, 1280 × 1280, 1024 × 1024, 800 × 800 |
| 3:2 | 2736 × 1824, 2160 × 1440, 1440 × 960, 1080 × 720 |
| 9:16 | 1440 × 2560, 1080 × 1920, 720 × 1280, 540 × 960, 480 × 854 |
Only sizes that fit on your screen (minus the Dock and menu bar) are shown. On a small screen, or when the window already fills the screen, the menu also offers your screen's own size, marked (Full Screen).
| Group | Sizes |
|---|---|
| Common | 1366 × 768, 1600 × 900, 1920 × 1080, 2560 × 1440 |
| 16:9 | 1280 × 720, 1366 × 768, 1600 × 900, 1920 × 1080, 2560 × 1440, 3840 × 2160 |
| 16:10 | 1280 × 800, 1440 × 900, 1680 × 1050, 1920 × 1200, 2560 × 1600 |
| 21:9 | 2560 × 1080, 3440 × 1440 |
| 4:3 | 1024 × 768, 1280 × 960, 1600 × 1200, 2048 × 1536 |
| 1:1 | 800 × 800, 1024 × 1024, 1280 × 1280, 1600 × 1600 |
| 3:2 | 2160 × 1440, 2736 × 1824 |
| 9:16 | 480 × 854, 540 × 960, 720 × 1280, 1080 × 1920, 1440 × 2560 |
Only sizes that fit on your screen (above the taskbar) are shown.
If the window won't resize
The alert Couldn't Resize Window appears and the recording continues at the current size:
| Message | Why |
|---|---|
| "This window is in full screen, so it couldn't be resized. Recording will continue at the current size. Exit full screen first if you want a different size." | Full-screen windows can't be resized. Exit full screen, then try again. |
| "This app wouldn't change its window size. Recording will continue at the current size." | Some apps set their own window size or have a minimum size. Resize the window by hand. |
| "The window couldn't be resized. Recording will continue at the current size." | Something else stopped the resize. Resize the window by hand. |
Record a custom area
Choose Select area
In the recording window, click the top row, then Select area. Click Start recording.
Draw the area
The screen dims and a selection appears, with the size of your last area if you've used one before. Drag the selection to move it and drag its edges or corners to resize it. A card in the middle shows Select area and the current size.
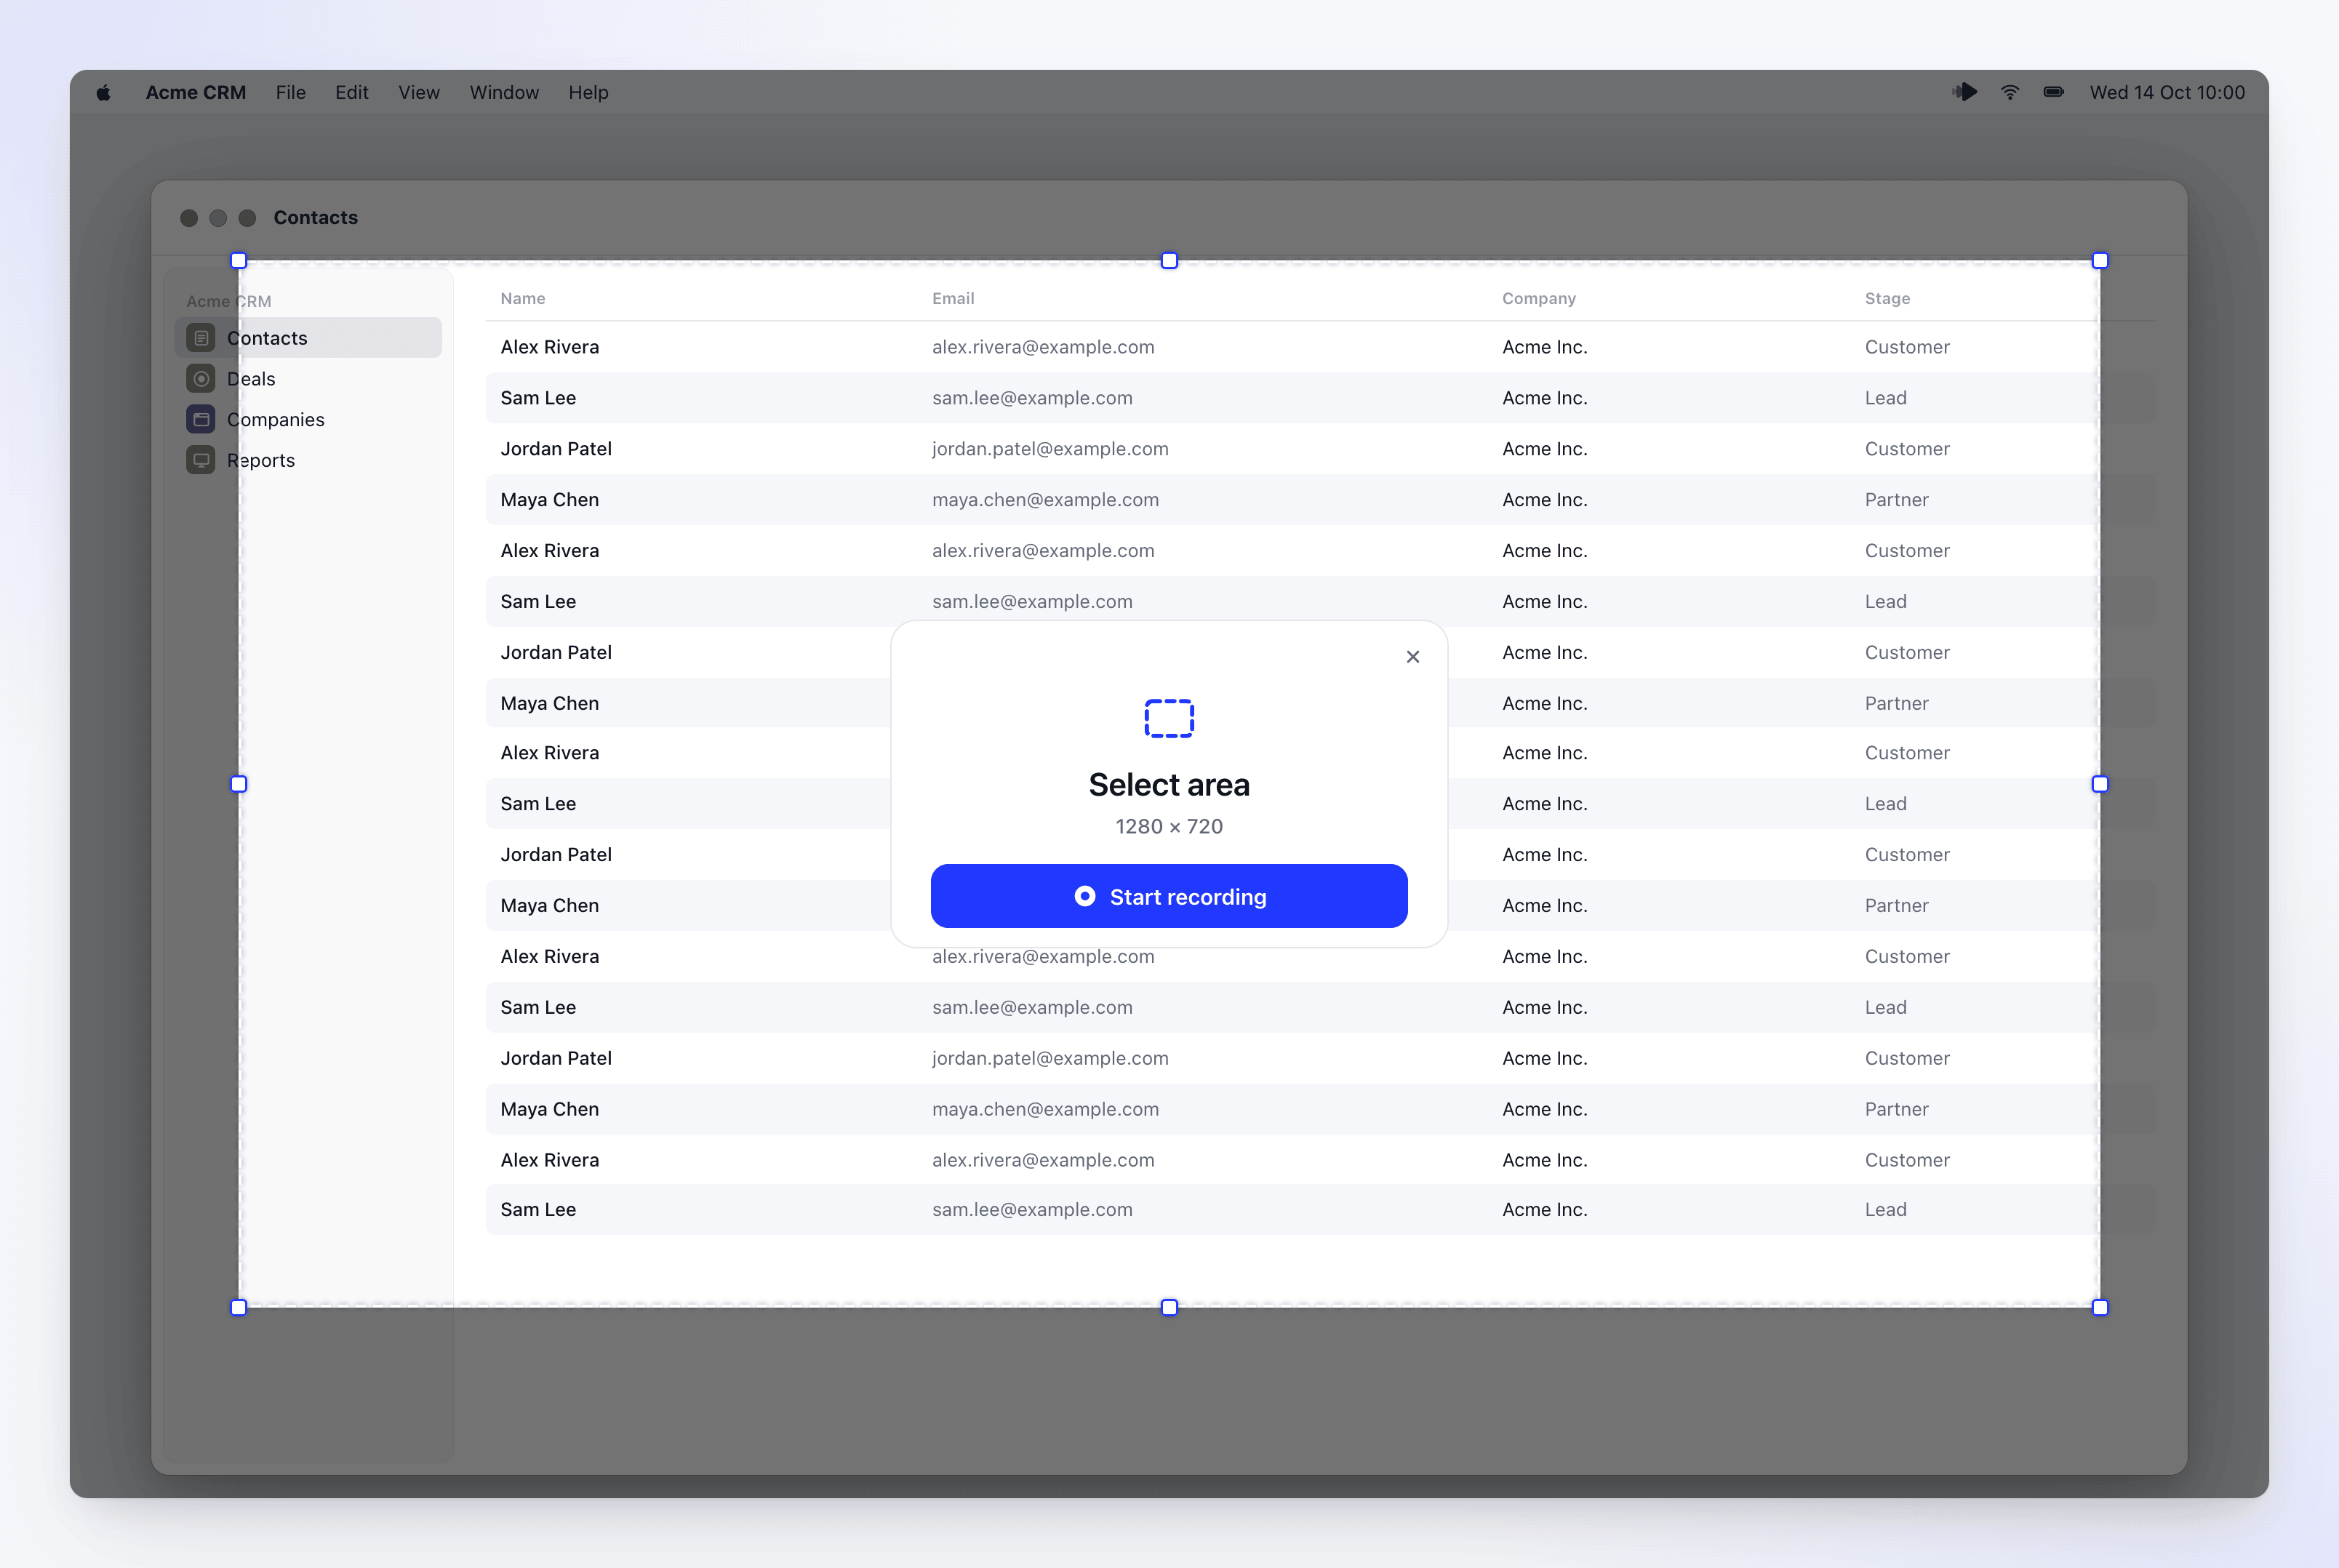
The smallest area you can record is 320 × 220.
Start or cancel
Click Start recording on the card or press Return (Mac) or Enter (Windows). Press Esc or click ✕ to cancel.
Clevera remembers the area, and the top row of the recording window shows it, for example Select area · 1280×720. While you record an area, everything outside it is dimmed so you can see the frame.
Troubleshooting
These messages come from the Mac app.
| Message | What to do |
|---|---|
| "Unable to find the specified window" — "The window might have been closed. Please select the window again." | Open the window, then pick it again from Specific window. |
| "Failed to focus on the selected window" or "Failed to activate the application" | Pick the window again. If it keeps happening, restart Clevera. |
| "The window is in an invalid state" | Close and reopen the window, then select it again. |
| "Invalid recording dimensions: …" | The window may be minimized or hidden. Make it visible and a reasonable size, then try again. |
| "Unable to find a display to record. Please reconnect your display and try again." | The area was on a display that isn't connected. Reconnect it, or choose Select area again on another display. |
| "Failed to start recording the selected area. Please ensure you have granted the necessary permissions and try again." | Check the permissions. |
On Windows, if the window you picked isn't in the list anymore, open it again and pick it from Specific window. If another window ended up in your recording, record again and keep the chosen window in front.